Introduction
In this post I will cover some techniques I found useful when developing Niagara FX that reacts to audio, I made one that you can check out here: Equalizer FX – Niagara UE5
This post will cover a more simple setup, showing how you can create a basic Visualize Audio FX that can be useful for debugging purposes. One other thing I will also go over is how you can create your own custom Submix so that you can make the FX react only to the audio coming from a target Submix instead of using the built-in MasterSubmixDefault, which contains every sound that plays in the level.
The following video shows the final result of the Niagara System this tutorial will breakdown:
Particle System Initial Setup
Before starting to sample audio we need some particles. Below you can find the initial setup of the Emitter I’ve made and all the User Parameters I’ve exposed.

User Parameters
- AudioOscilloscpe → target submix to sample audio from
- AudioSpectrum → target submix to sample audio from
- FadeSpeed → speed rate at which the sampled audio value should fade , explained in the “Fade Sampled Audio” section
- isSpectrum → this is a boolean that switches the logic from using the AudioOscilloscope and the AudioSpectrum, two different methods to sample audio
- VisualizerHeight → used to set the particles’ height
- VisualizerResolution → how many particles , which consequentially defines the resolution and precision of the sampled audio’s visualization
- VisualizerWidth → used to set the particles’ width
Emitter Properties
The emitter is GPU based, make sure you set some Min and Max bounds
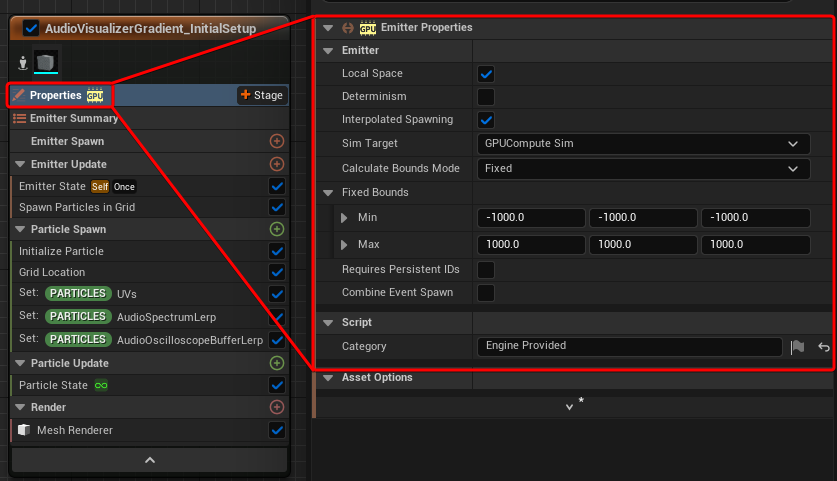
Emitter State
Life Cycle Mode is set to Self
Loop Behaviour to Once
Loop Duration Mode to Infinite

Spawn Particles in Grid
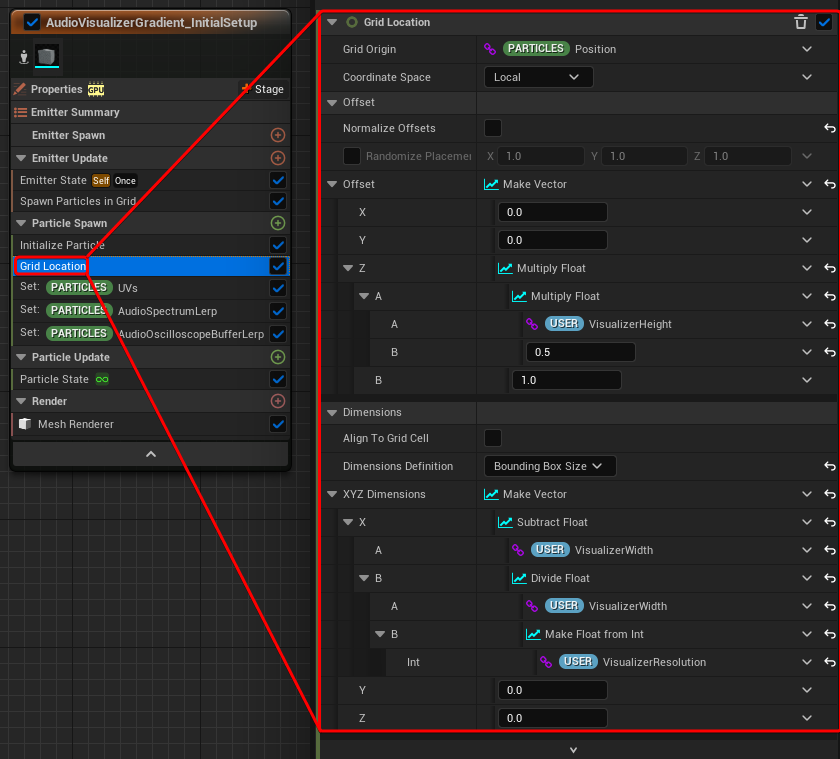
the particles are disposed on a horizontal line, to achieve this I’ve used Spawn Particles in Grid and Grid Location modules.
Y and Z Counts are set to 0, while X is defined by the VisualizerResolution User Parameter

Gird Location
The *Grid Location* module works hand-in-hand with the Spawn Particles in Grid.
There are some Z offset values, this is to move the particles up by half the size of the particles (defined by VisualizerHeight), doing so the particles will be placed above the Niagara System’s Pivot Point.
For the Dimensions, I’m doing a simple operation on X so that the width’s result perfectly matches the VisualizerWidth User Parameter in units. Using the VisualizerWidth value directly doesn’t give a perfect result, it’s going to be wider by one particle width.
What the X Dimensions fixes:
Before → the particles are wider than 256 units and there is a small gap between them

After → the particles perfectly match the 256 units in width and there is no gap between them

Initialize Particle
For the Initialize Particle module, the most important part is to set the Mesh Scale X and Z.
Z is simply using VisualizerHeight User Parameter,
To calculate the correct size in X I’m dividing VisualizerWidth by VisualizerResolution.
Both of them are divided by 100 because the mesh used is 1x1x1 meter, the division gives us the value in millimeters.
I’m also doing a little trick on the colour just to get a random value for each particle and distinguish them from one to another.

Set Particles Attribute UVs
I made 3 custom Particle Attributes, the first one is a Vector2D and is called UVs.
This is a useful technique to get a 0-1 gradient value when using the Spawn Particles in Grid and Grid Location modules, they output a GridUVW value, which we can store in the particles.
In this FX I’m actually only using X, so you could store it to a Float instead of a Vector2D.

This is what you would get if the particles’ colour was set to the U value

Set Particles Attribute AudioSpectrumLerp and AudioOscilloscopeBufferLerp
The other 2 attributes are called AudioSpectrumLerp and AudioOscilloscopeBufferLerp, they will get used later in the Fade Sampled Audio section.
They are both set to 0 just to get them initialised, if this isn’t done when they get referenced the Emitter will have to give compiler errors.

Particle State
This is the only module in “Particle Update” section for now, here I just turned off *Kill Particles When Lifetime Has Elapsed*, this way the particles are persistent once spawned.

Mesh Renderer
In the Renderer I’ve added a Mesh Renderer and removed the Sprite one.
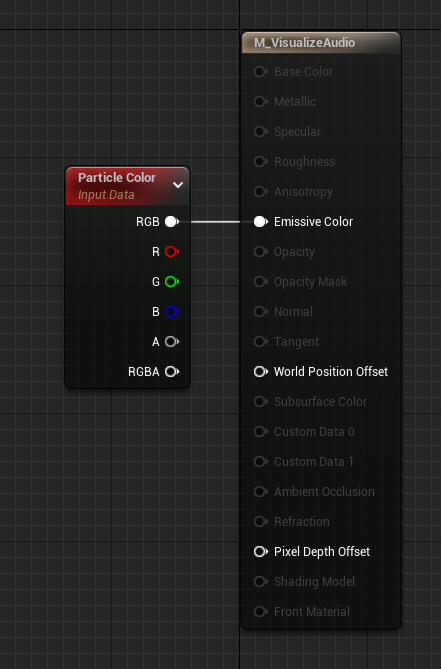
I’m just using the engine’s Cube which is 1x1x1 meters and overwriting the material with M_VisualizeAudio

M_VisualizeAudio is just an unlit Material that uses The Particle Colour as Emissive.
Sample Audio
Now the Emitter is ready to go and we can start working on the Sample Audio Module.
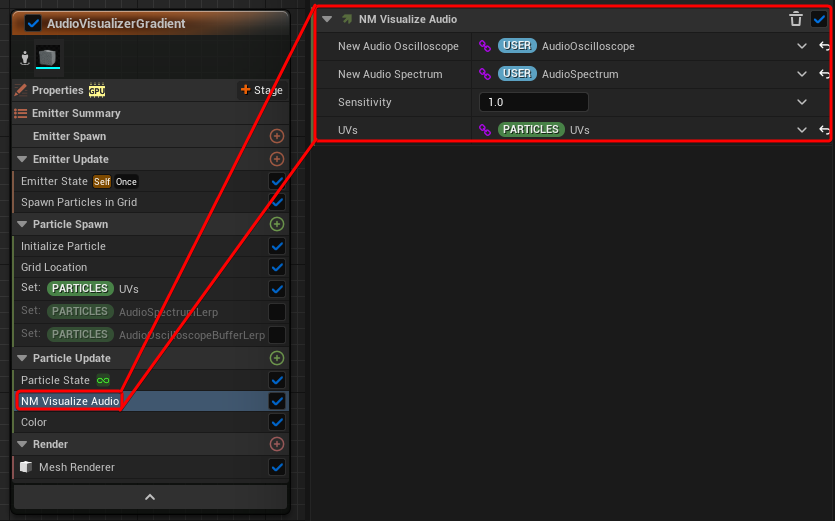
The module is added to the Emitter in the Particle Update section and has a Map Get node with the following inputs:
- New Audio Spectrum → Audio Spectrum → uses the matching User Parameter shown previously in the post
- New Audio Oscilloscope → Audio Oscilloscope → uses the matching User Parameter shown previously in the post
- UVs → vector2D → uses the particle’s UV Attribute shown previously in the post
- Sensitivity → float → could also be exposed as a User Parameter
Both the Audio Spectrum and Audio Oscilloscope get sampled using the Audio Spectrum and Sample Audio Buffer nodes respectively which are also using the U value of the particles’ UVs Attribute for sampling.
Then they get multiplied with the Sensitivity float input to change their intensity, I’m also multiplying the Audio Oscilloscope by an extra value of 10 because I noticed that its result is generally smaller compared with the Audio Spectrum’s.
Then I’m clamping the values between 0 and 1 with Saturate nodes and set them as new Particles Attributes

Looking back I think I would have added the switch logic here, so that the module only sets one attribute and based on a Boolean it switches from using the Audio Spectrum and Oscilloscope. This is especially useful if you need to reference the sampled audio attribute in multiple modules in the FX.
Sampled Value Uses Examples
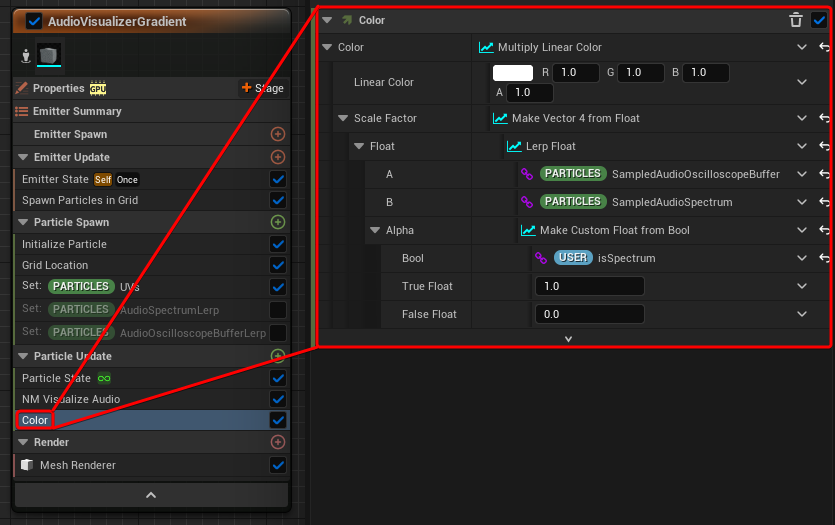
Now you can use the sampled audio value as a lerp to animate the particles in various ways, a very simple example is to just change their colour.
Below you can see how it can be used in a Color module to animate their brightness, in this case I’ve done it with a multiply operation but you can lerp between 2 distinctive colours as well with a lerp. The logic also includes if it should be using the Audio Spectrum or Oscilloscope sampled value.
Result:
For my Equalizer Classic FX I’ve used the sampled audio value to scale and offset particles as well.
Fade Sampled Audio
A technique I found useful is to fade out the sampled value over time so that it slowly reaches 0 instead of being hard set to it when there is no sound playing.
I’ve duplicated the emitter and moved the particles down from the Grid Location module, so that I can compare the 2 results.
The module takes the Sampled Audio and Lerp attributes for both the Audio Spectrum and Oscilloscope. These could actually be hard referenced within the module, but in this case I’ve exposed them as inputs and manually input them in the Module’s Emitter.
The module also takes the User Parameter FadeSpeed.

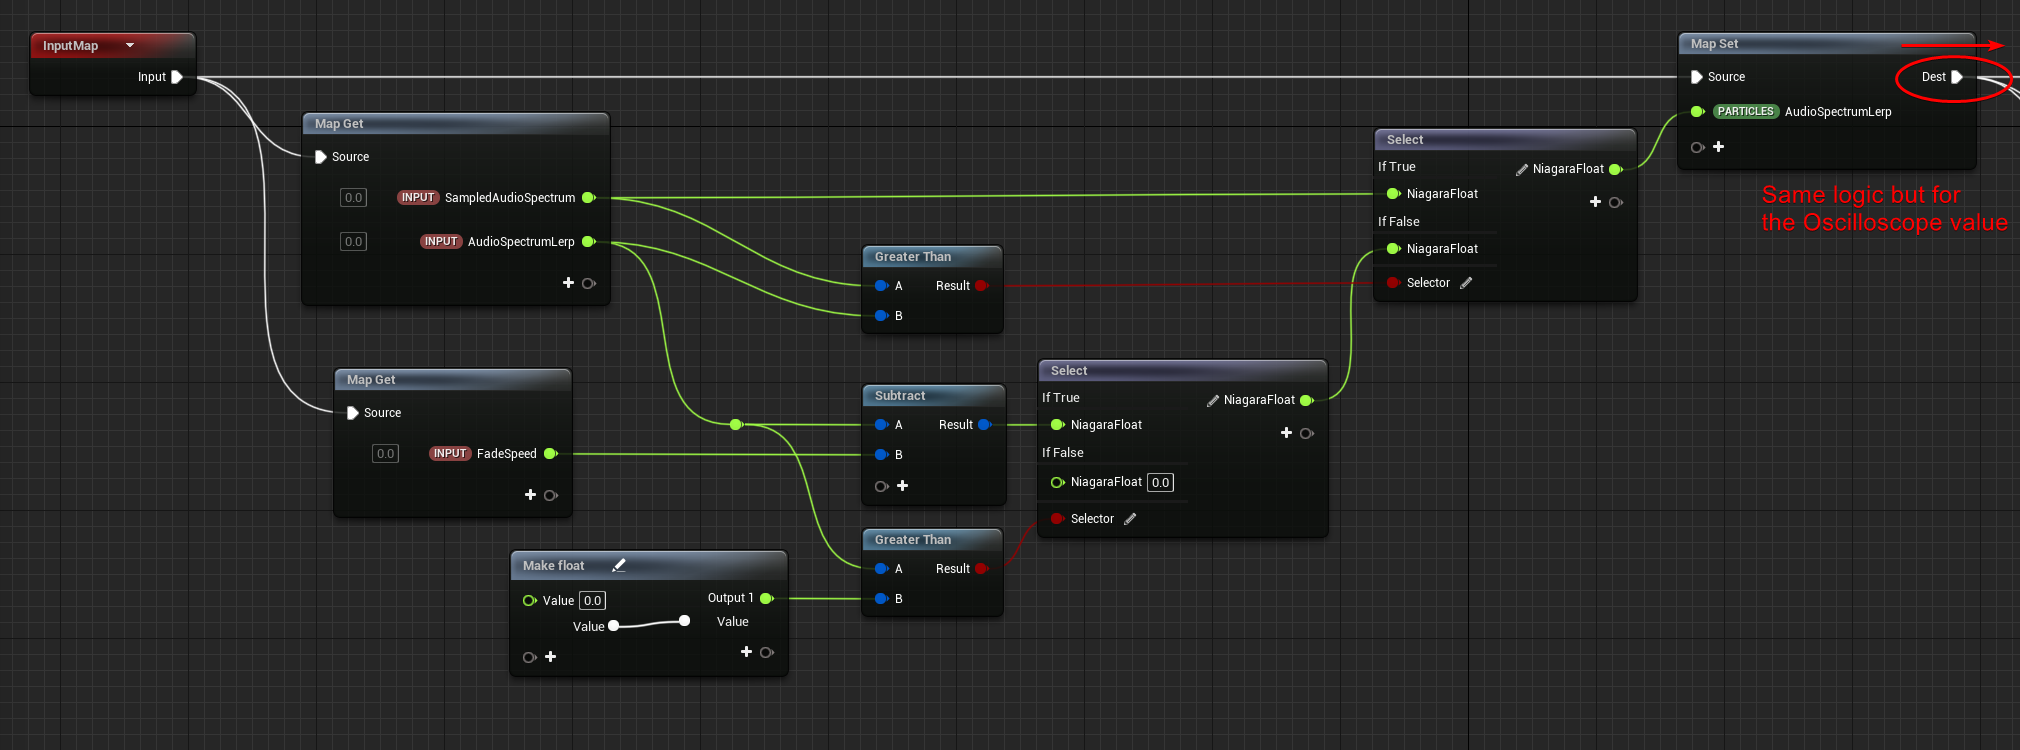
The logic looks a little bit convoluted but what it’s doing is comparing the Sampled audio value with the Lerp one.
If the sampled audio is bigger the lerp value it gets hard set to it, so that they match.
Otherwise a small float amount (FadeSpeed) chips away from it with a subtraction operation, so that it slowly reaches 0 and when it does the value keeps getting set to 0 until a new sound is heard.
On the right the same logic is duplicated, but applied to the Oscilloscope attributes.
Result:
If you know a better way to achieve this please let me know!
Sample from Custom Submix
At the moment when the Niagara System is placed in the level, I’ve always used the MasterSubmixDefault as the input for the Audio Oscilloscope and Spectrum sampler, which is what every tutorial online tells you to use.
The problem I had with this is that every sound that is played in the level is sent to the MasterSubmixDefault, which means you can’t use it when you have multiple sounds playing in the level and you want the FX to react to only specific cues.
I’ve never really used audio much in Unreal so this was all new for me, I wanted to share my findings because I noticed there isn’t much information online.
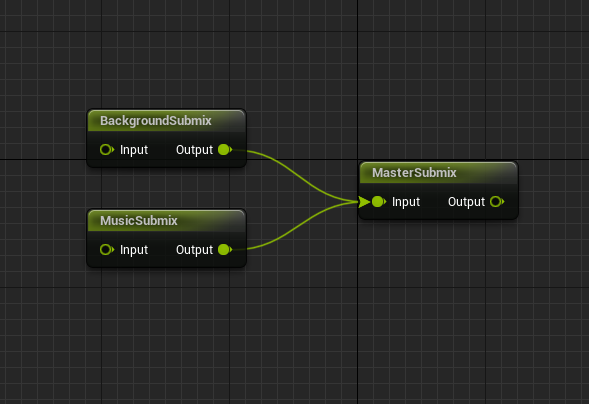
To achieve this you need to set up your own Submixes, for testing purposes I created 3 of them:
- MasterSubmix → my new custom Master Submix
- BackgroundSubmix → Submix that will contain background noise sounds
- MusicSubmix → the Submix that will contain the Music I want my FX to react to
I’ve then connected them as follows inside the MasterSubmix
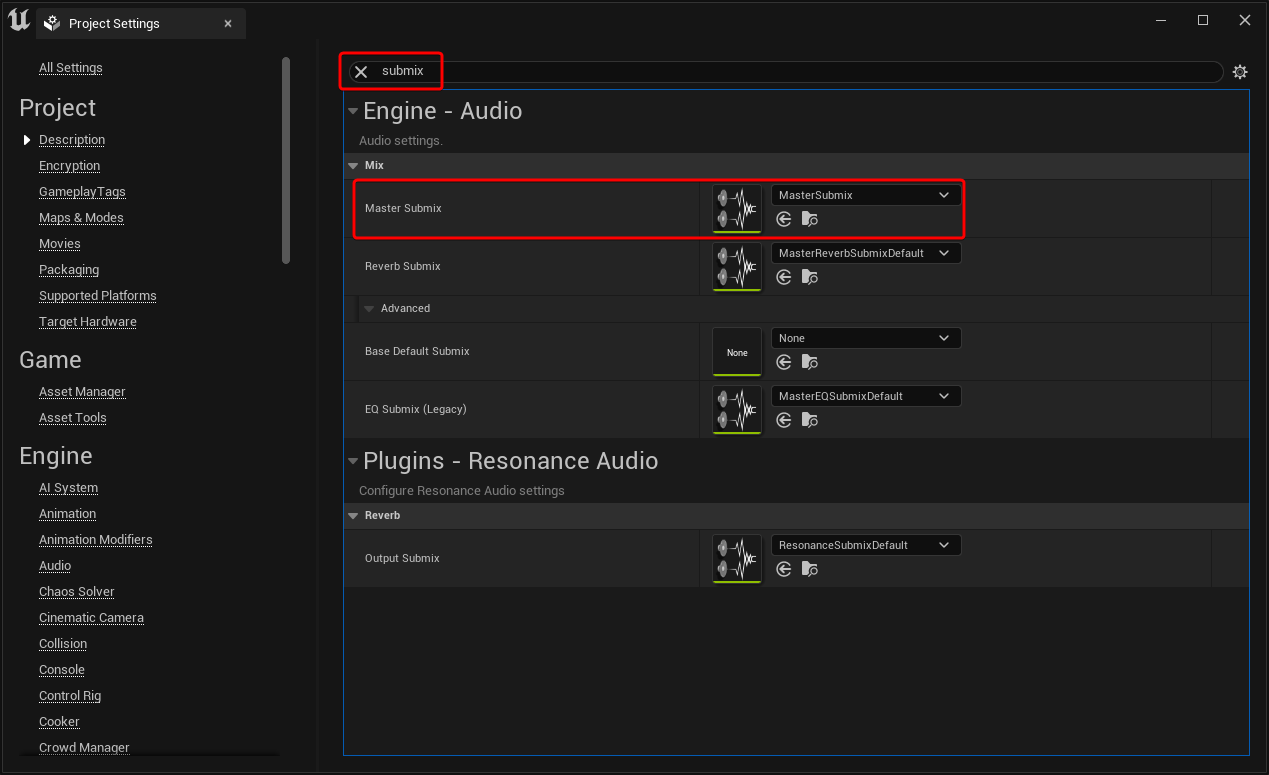
One important thing to do is to change the Project’s default Master Submix in the Project Settings
Now we need to tell the various Cue assets to which Submix they should be sent to. This can be done by creating Classes Actors that then get applied to the Sound Cue Assets.
Same as the Submixes, I made 3 of them:
- SC_Master
- SC_Background
- SC_Music
I’ve connected them as follows but I noticed that it doesn’t really matter, so I’m not sure what this actually does (let me know if you do!)
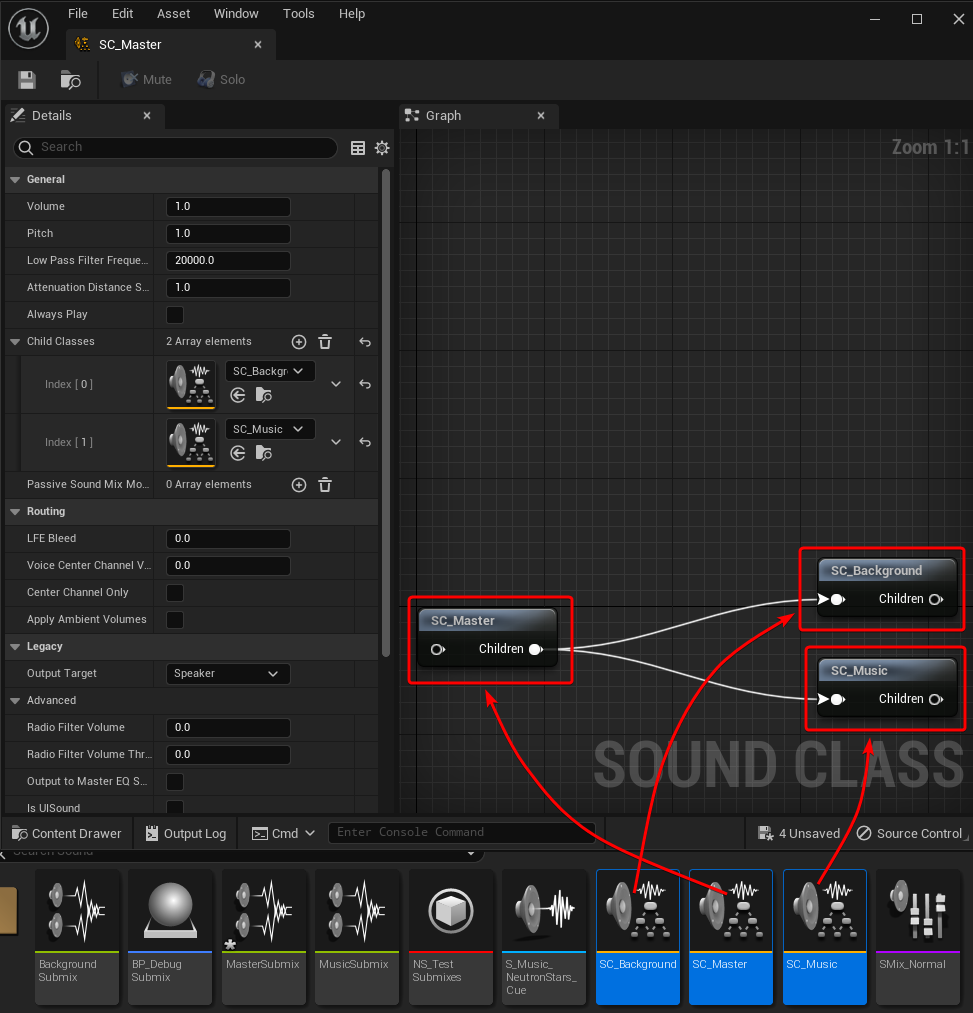
However what you do need to do is to change their Default Submix to the matching one for both SC_Background and SC_Music
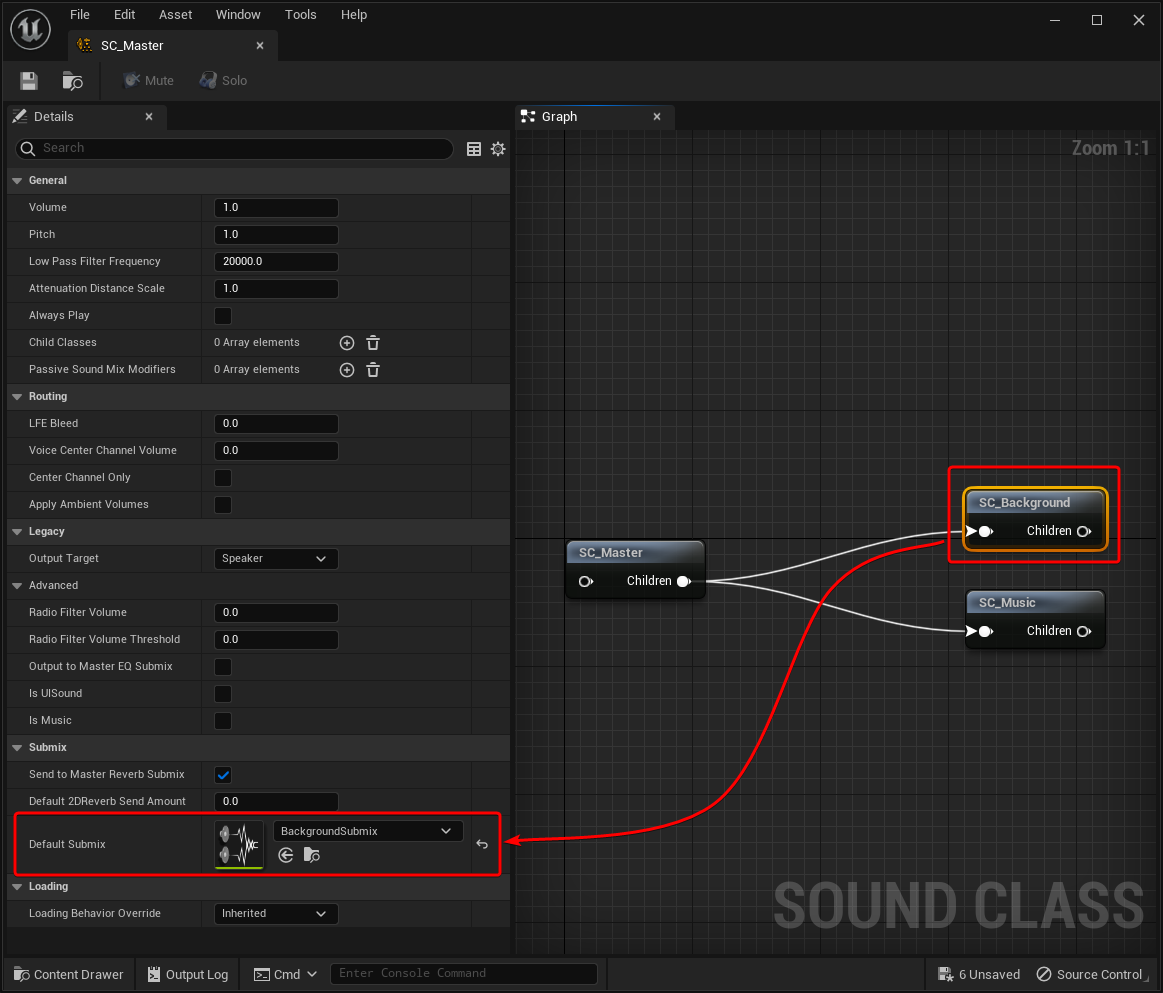
Now you can open up the Sound Cue Assets and set their Class based on what Submix you want to send them to.

I think this is the approach you would want to follow when working on a big project, having Sound Classes feels like the way to go to better manage sound.
However, I found you can actually set the Submix directly in each Sound Cue asset avoiding having to set up Sound Classes, if this parameter is set then the value overwrites the Class’ settings.

The main issue I’ve encountered doing this is that when everything was setup when I was feeding my custom Submix to the Niagara FX the particles wouldn’t react at all.
I posted on Unreal’s Forum about it and I have to thank @James.Wizard for replying with a solution.
Turns out the Submixes have the option to get automatically disabled when they are silent as a CPU optimization, the problem is that they should get re-enabled if the sound is sent to them, but it doesn’t look like that’s happening because by turning off the feature the Niagara FX starts reacting as expected (this project was done using UE5.1.1)

In the video below there are 3 Niagara systems, and each of them is assigned to a different Submix
Conclusion
I hope you found this tutorial useful, if you do create an FX that is driven by audio please share it with me I would love to see it!
Thanks for reading and have a great rest of the day!

Leave a Reply