Documentation & Dev Log
Check out the project if you haven’t seen it yet:
Simple Billboard Baker
You can get the plugin from here:
Simple Billboard Baker Tool – Unreal Engine
The Tool
Introduction
I recently picked up again a Vines Roots Generator tool I worked on years ago, to finish developing some features and went down a rabbit hole when looking into the Spline Thicken feature, I wanted to bake a branch texture.
I also recently tried to use Ryan Brucks’ Impostor Baker, I found it to be overengineered for just baking general billboards, so I wanted to make a simpler version, but I did take inspiration from it.
Another thing that bothered me about his Impostor Baker is a couple of its limitations that I wanted to get away from:
- The input only takes single static meshes
It’s mostly fine for simple assets like foliage, but what if you are trying to bake, for example, a complex building made out of multiple instanced meshes?
I managed to get around this limitation by using the Merge Actors tool, but I think using SceneCapture2D together with Render Targets and Post Process Materials would make my baker more versatile - To make it work you need to add a material function to each material used by the static mesh
Using SceneCapture2D and RT also helps with this limitation, because it allows you to bake what Unreal is rendering directly. Black pixels bleeding from the alpha edge might cause problems tho, I will need to look into doing some dilation.
If you need to render GBuffer Layers for some quick and easy captures you could also look into the following console commands to dump the GBuffer Layers:
r.BufferVisualizationDumpFrames 1 → tells High Resolution Screenshot tool to dump all the layers of the GBuffer

r.BufferVisualizationDumpFramesAsHDR 1 → dumps them in HDR format
I found them watching Unreal Engine’s Live Training Baking Materials to Textures.
However, this tool I made bakes the various GBuffer layers as textures using Render Targets.
Setup
The following graph shows the tools’ setup flow and how the various elements interact with each other:

Below you can find an explanation and description of all the elements:
- EUW_SimpleBillboardBaker is used to control BP_SimpleBillboardBaker
- EUW_SimpleBillboardBaker is used to gather the information needed from the user and control BP_SimpleBillboardBaker to bake the textures
- Defines:
- Target Bakers
- Final output Resolution, Name, and Directory
- SceneCaptures2D’s Camera Projection Type, Ortho Width/FOV, and Location
- Ability to Bake Multiple Textures at once using the selected bakers
- Ability to Bake Single Textures using target baker
- Ability to preview GBuffers
- Generates Material Instance from M_Billboard_Preset (contains a Camera Facing Billboard Function)
- Defines:
- BP_SimpleBillboardBaker contains all the elements necessary for the bake
- 3 SceneCpature2D components that use 3 different generated Render Targets based on input resolution:
- Flex → with PP material to switch between GBuffer layers. Capture Source set to: Final Color (HDR) in Linear sRGB gamut
- Alpha → uses the default Capture Source setting to store Alpha: SceneColor (HDR) in RGB, Inv Opacity in A
- Normal → to store World Normals, more accurate results compared to World Normal GBuffer (SceneTexture ID8). Capture Source set to: Normal in RGB (Deferred Renderer only)
- 1 SceneCapture2D used to preview the GBuffers
- Same setup as Flex
- Useful to adjust the SceneCaptures2D to frame the subjects (using Material ID)
- Render Target is not generated, uses a 2k RT from the Content Browser
- StaticMesh Component to preview generated Material Instance that contains the baked textures
- Render Target Textures are used in M_Drawer, an instance of it is used to draw onto the secondary Render Targets before they get saved as Static Textures. It contains parameters to activate the desired baker:
- Scene Color → uses RT from Alpha SceneCapture2D
- Base Color → uses RT from both Flex and Alpha SceneCapture2D (RGBA)
- Metallic → uses RT from Flex SceneCapture2D
- Specular → uses RT from Flex SceneCapture2D
- Roughness → uses RT from Flex SceneCapture2D
- Emissive → uses RT from Flex SceneCapture2D, and lights need to be turned Off
- Opacity → uses RT from Alpha SceneCapture2D
- World Normal → uses RT from Normal SceneCapture2D
- Subsurface Color → uses RT from Flex SceneCapture2D
- Ambient Occlusion → uses Flex RT from SceneCapture2D
- 3 SceneCpature2D components that use 3 different generated Render Targets based on input resolution:
How to use it
Billboards can be baked with some simple steps
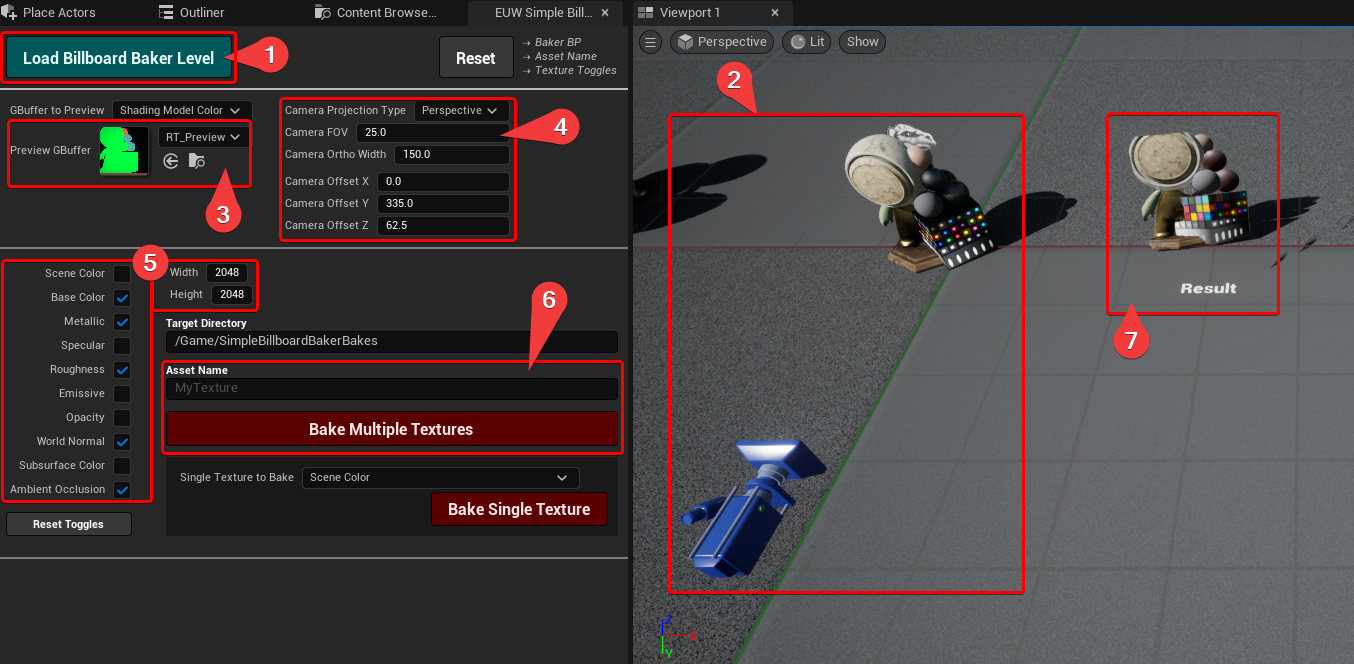
- Run the Simple Baker EUW
- Click on the top left button “Load Billboard Baker Level”
- Place the assets you want to bake in front of the camera
- Open RT_Preview to check what the output will be
- Adjust the Scene Capture Settings such as the Projection Type, FOW/Ortho Width, and its location (keep looking at RT_Preview to check the result)
- Select the GBuffers you want to bake and set the textures output size
- Give it a Name and change the Target Directory if necessary, once done press the “Bake Multiple Textures” button
- Once the bake is completed you should be able to see in the level the Material Instance created with all the textures assigned
Exploration (dev log)
How it Works and Encountered Issues
Here’s a list of all the topics I’ve had to deal with and thought would be good to keep track of for the future while making the tool.
- GBuffers Layers to SceneCaptureComponent2D
- Drawer Material Setup
- Setup Alpha for Output Render Target
- Ambient Occlusion Baker
- Emissive Baker
- Camera Facing Material
- World Normals Baker
- Draw on Multiple Render Targets
- Save RT as Texture
- EUW Fetch Assets Filepaths from Directory function
- Hide Actors From Scene Capture 2D
- Update Material Instance using EUW
GBuffers Layers to SceneCaptureComponent2D
To render the various GBuffer passes I used a post-process material and added it to the SceneCapture2D in the construction script and changed the Capture Source of the SceneCaptureComponent2D
PP Material
The Material’s Domain is just set to Post Process and the graph looks like this:
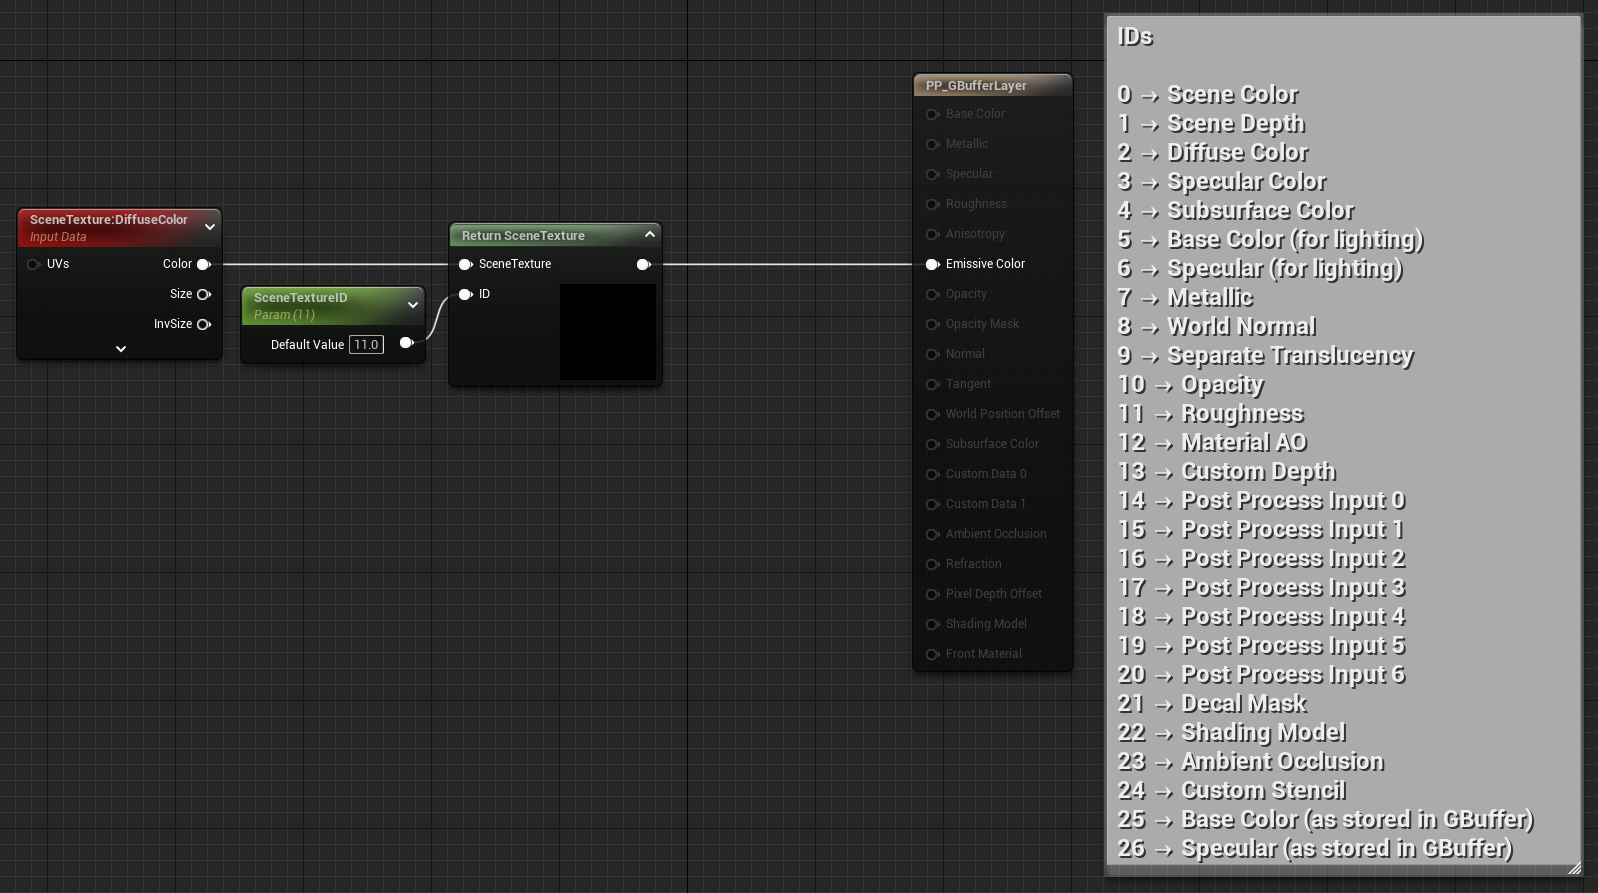
Return SceneTexture is a custom node, more information can be found in the resources
return SceneTextureLookup(GetDefaultSceneTextureUV(Parameters, ID), ID, false);Set PP Material to SceneCaptureComponent2D
The following logic creates a Dynamic Material of the Post Process, sets which GBuffer Layer should be activated using an ENUM, and then adds the material to the SceneCapture2D component

If you look at the Post Process Material Settings of the SceneCaptureComponent2D you won’t see them update, but the material does get set to it
Visualize PP Materials on SceneCaptureComponent2D
To make the Post Process Materials work on a SceneCaptureComponent2D, the Capture Source needs to be set to:
Final Color (LDR) in RGB
or
Final Color (HDR) in Linear sRGB gamut
In this case, I’m selecting the second one to get linear values.
Drawer Material Setup
The Drawer Material is used as a Material Instance in the tool.
The setup is very simple, it has some Texture Parameters that take in the Render Targets used by the 3 SceneCapture2Ds, then there is a scalar parameter for each GBuffer layer plugged in a chain of “multiply” nodes, their default value is 0, this way nothing is visible. They then get turned on one by one based on the GBuffer that needs to be baked.
The Material also contains a Colour parameter that gets used for the BGs of the bakes.

Setup Alpha for Output Render Target
I found storing the alpha to the output Render Target tricky.
Because the main SceneCaptureComponent2D is using a post-process material it won’t be rendering the empty space as transparent, to counter that I’ve set up a second SceneCaptureComponent2D with the default SceneColor (HDR) in RGB Inv Opacity in A Capture Source.
The Alpha will be inverted, but that’s fine because when using the “draw Material to RT” node it gets inverted again.
Then they are both used in the M_Drawer material, it’s important to set the Blend Mode to AlphaComposite (Premultiplied Alpha) and have the Shading Model setting set to Unlit
Below you can find a screenshot of the graph for the first M_Drawer test.
In the final setup, the Alpha gets turned on only when capturing Base Colour or Scene Capture Layer.

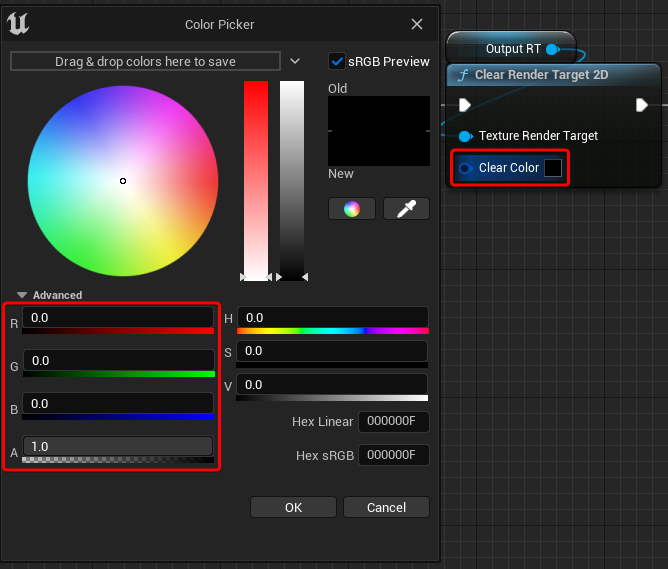
Another important thing is to clear the RT before drawing into it, with RGB set to 0 and alpha to 1
Ambient Occlusion Baker
I managed to get the Ambient Occlusion output out of Scene Texture Ambient Occlusion (number 24) when setting the Global Illumination Method to `Screen Space (Beta)`, this can be done in the Project Settings but I’ve changed the SceneCapture Flex PostProcess settings instead.
It’s not really working when the scene capture is set to Orthographic, using Prospective might be a generally better solution, since it makes the look of the capture more natural as well.
Emissive Baker
Emissive is not a GBuffer Layer, but it can be captured by getting all the values above 1 in the Final Scene renderer. However, before capturing it all the lights in the level need to be turned off. (Check out resources)
During the first tests I encountered a bug where I had to press the baker button twice when capturing the emissive, that’s because all the logic was triggered at once, both the turning off of the lights and the Render Target capture. When I started developing the logic in the EUW this wasn’t an issue anymore because I could add a delay node between the two actions, which it’s not possible when triggering a “Call in Editor” custom event from a Blueprint.
Camera Facing Material
I wanted to create a function that deals with both WPO and Normal calculation, this became a whole separate rabbit hole. Calculating the correct Normal was a bit challenging, the exploration and result deserved its own blog post article, which you can find here.
What you need to know for the “World Normal Baker” section is that the function can take in a Normal texture, but it needs to be in Tangent Space.
World Normals Baker
I found the result of a Normal texture rendered using a SceneCapture2D set to “Normal in RGB (Deferred Render only)” to be better than taking the GBuffer from the Post Process. So I added a third SceneCapture2D to the blueprint, just for capturing the Normal.
Capturing a Tangent Space Normal texture from a World Normal output (which the Billboard Material function I created requires) can be done by aligning the Scene Capture facing down the Z axis.


However this is annoying to work with in the level, so instead I’ve rotated both the camera and the subject by 90 degrees around X, so that they are perpendicular to the XY axes plane:

I then accounted for it in the Drawer material by rotating the vectors of the captured image, I’m Normalizing it just in case, and remapping the values from -1 and 1 to 0 and 1.
The remapping is needed because the Scene Capture with the Capture Source set to “Normal in RGB” is able to store negative values in the render targets, but once the drawer material is drawn on the target RT (using the Draw Material to Render Target node) negative values get discarded so Normal needs to be remapped first.

They then need to get remapped mapped back from -1 to 1 in the Billboard Material because the texture Sampler Type is set to “Linear Color” and not to “Normal”, this is because the texture contains the blue channel directions already calculated.
I’m not using the Normal Sampler Type because it ditches the blue channel and calculates it from the Red and Green ones, but the baked texture has already the information needed stored in the blue channel. Just FIY the Normal Sampler Type also does the -1 to 1 remapping automatically.

Draw on Multiple Render Targets
Getting the tool to draw different GBuffers on separate Render Targets using a single button was quite challenging.
Up until a certain point, I was drawing them one by one using an ENUM and a switch node.
The weirdest behaviour I found while expanding the functionality was that by exposing the “Target Texture to Bake” parameter as a function input, the Drawer material wasn’t updating before the drawing to the render target happened, causing the captured image not being the right GBuffer selected.
For this reason, I kept the hardcode reference inside the function instead of exposing it

The Initialize Baker function you can see in the screenshot above prepares all the elements needed before the baking happens:
- Sets the PP Material to pick the target GBuffer Layer
- Prepares the Drawer Material by first resetting all the parameters and then setting only the ones needed (the correct multiply Scalar Parameter, BG colour and alpha if needed)
- Clears the output RT with the colour RGBA 0,0,0,1

Another painful thing to deal with was chaining the capture of the GBuffer one after the other.
I initially tried to have them all in the blueprint attached to one “Call in Editor” Custom Event, but similar to the issue explained before, the result textures didn’t match the desired GBuffer selected.
So I started looking into making an Editor Utility Widget, after more attempts I found that the only way to reliably capture them was by having a small delay between the updating of the Post Process/SceneCapture2D’s RT and the drawing of the Drawer Material (another option could have been to have multiple SceneCapture2D with their own PP Material Instance for each GBuffer, but I wanted to keep the single “Flex” SceneCpature2D setup).
In the EUW I first managed to recreate the baking of the various passes one by one duplicating multiple times the following logic:

I then recreated the engine “For Each Loop” Macro in the EUW, copying the graph from the “StandardMacros” Blueprint Macro Library and added a delay feature to it (check out the Resources section for making your own).
This way I could loop over the logic without having to duplicate the graph multiple times. Because there is a delay node in the Loop Body as well, the Delay value on the Macro needs to account for that, the two timers will start at the same time, if they are of the same duration the next Loop Body will trigger before the previous one is ended. Setting the For Each Loop’s Delay double the time of the Delay node used in the Body fixed the issue.

I found that ENUM Arrays are unsupported by the EUW’ SinglePropertyView, (I’ll probably make a tutorial on how you can expose variables in a EUW at some point, I’ll post the link here if I do make it)

Because of this, I’ve set up a Boolean parameter for each GBuffer, and then just before starting using the ForEachLoopDelay I add the baker to the ENUM based if the Boolean is true or false:

Save RT as Texture
I found 3 nodes that can potentially save a Render Target as a Texture, I’ve only tried the first because it was working as expected:
- Render Target Create Static Texture Editor Only
- Export to Disk
- Export Render Target
The only caveat I found is that I couldn’t target the plugin folder as the output, so the default file path I’m using is /Game/SimpleBillboardBakerBakes/ instead of /Plugins/SimpleBillboardBaker/Bakes, I’ve also tried /SimpleBillboardBaker/Bakes but it also doesn’t work.
Using /Content/SimpleBillboardBakerBakes/ is also an alternative to /Game/SimpleBillboardBakerBakes/.
The baker then adds a subfolder folder using a specified name: `/Game/SimpleBillboardBakerBakes/MyTexture/` for example
Initially, I had the logic inside Billboard Baker’s blueprint, however, I moved it to the EUW so that I could save the Texture2D asset that it creates. Otherwise, the asset fetching was failing when trying to turn on sRGB on the baked textures that require it.

EUW Fetch Assets Filepaths from Directory Function
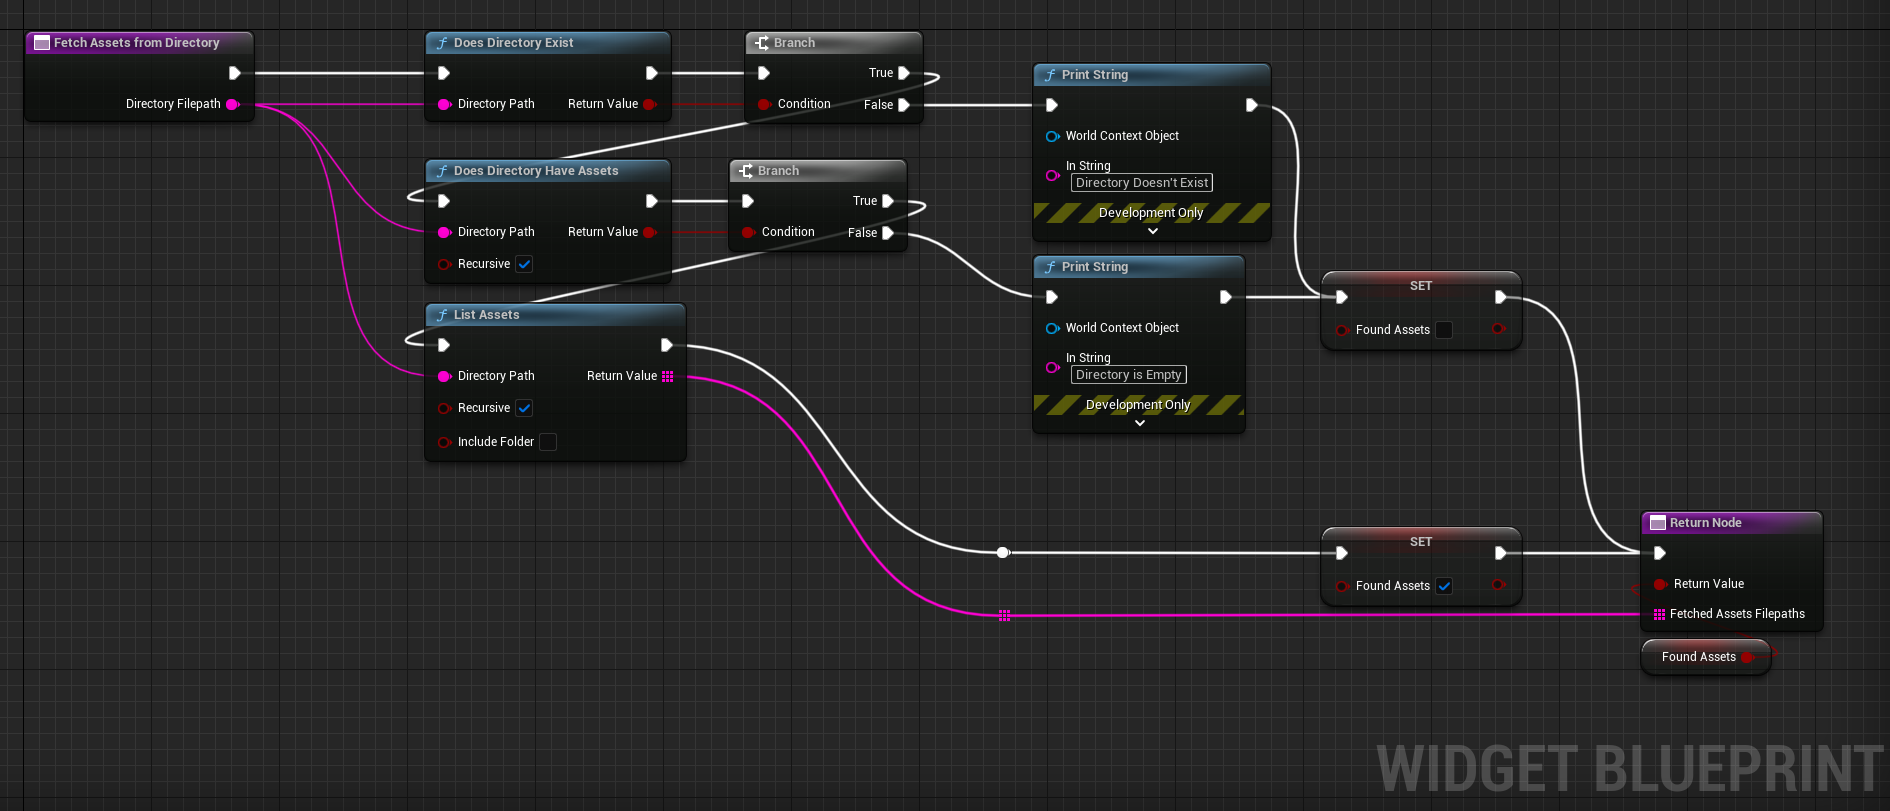
I made the following function to fetch the file paths of assets that live in a specific folder, this way they I can then manipulate their information by using Find Asset Data and Cast To nodes
However, when using the Find Asset Data node on my target asset, I was getting the following warning
`LogPackageName: Warning: TryConvertFilenameToLongPackageName was passed an ObjectPath (/Game/SimpleBillboardBakerBakes/MyTexture/T_MyTexture_COLA.T_MyTexture_COLA) rather than a PackageName or FilePath; it will be converted to the PackageName. Accepting ObjectPaths is deprecated behavior and will be removed in a future release; TryConvertFilenameToLongPackageName will fail on ObjectPaths.`This is because the fetched filepath it’s actually a reference to the asset itself and Unreal adds .AssetName at the end of the file path, but the Find Asset Data node doesn’t like that, but it can be easily fixed by splitting the string before the file path gets used.

Hide Actors From Scene Capture 2D
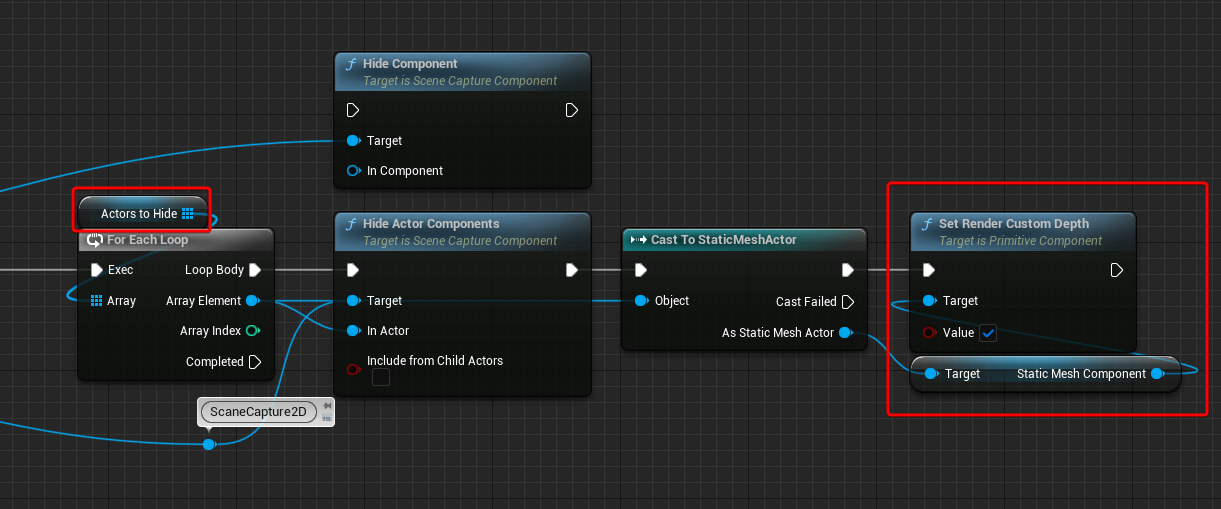
Actors can be hidden from a Scene Capture 2D using the following nodes.
This technique is used to hide the ground plane from the baker, but it only works for the SceneCapture2D_Normal and SceneCapture2D_Alpha

It doesn’t work for SceneCapture2D_Flex because it uses a Post Process Material to capture the GBuffer passes. So instead I’ve set up the PostProcess material to mask the GBuffer using the CustomDepth information.
This way all the Actors that have the toggle “Render CustomDepth Pass” turned on will be ignored
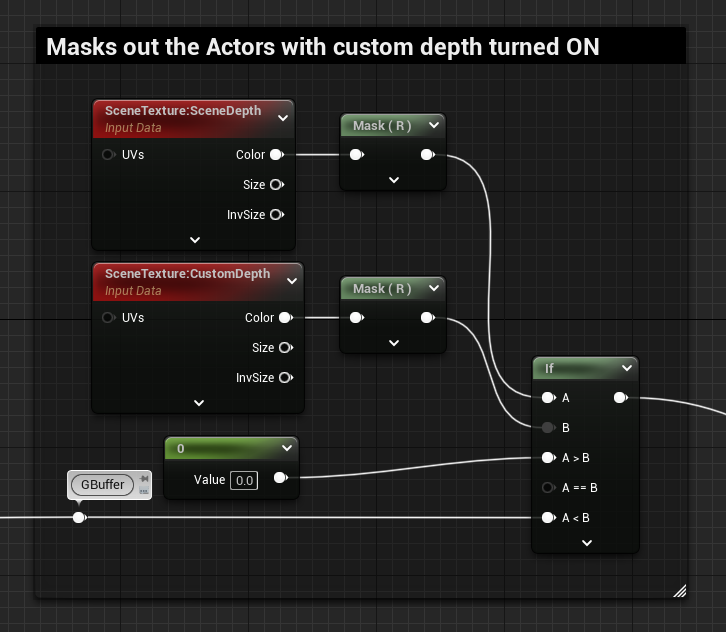
I’ve exposed an array called ActorsToHide to the baker’s blueprint, then in the construction script it hides the selected Actors with both techniques so that they disappear from all the bakers.
Update Material Instance using EUW
When updating the parameters of an existing Material Instance through the EUW, for example, when adding the newly baked texture to the Material Instance used for Previewing the result, sometimes the Material wasn’t actually showing the textures, as if they were not set at all, even if by opening the asset you could see the parameter being edited.
I found using the Update Material Instance node fixes the issue.

Wishlist Features
The tool is currently in a solid state, and all the core features have been added.
However, here’s a list of the things I also wanted to get around exploring and include with the baker, but I feel like I’ve spent enough time on it already, and if I don’t wrap it up it will just continue forever, after all, it should be a “Simple” Billboard Baker.
I’ll leave them here for my future self:
- Add the control to select a target actor and automatically calculate the bounds so that the camera can frame it
- Look into dilation and if it can be applied to the texture the baker generates
- Make a texture packer tool that can take the baker’s outputs and create packed textures based on the user’s controls
- Render multiple sides of the subject and pack them in a flipbook, then switch between them in the Material based on camera position relative to the billboard plane mesh
Conclusion
I started writing all this just for my future self when coming back to the tool to reference the various techniques I used, but I thought there might be something useful for everyone.
I hope you found this post insightful, have a great rest of the day!
Resources
Here’s a list of the various resources I’ve used during the exploration and development of this Simple Billboard Baker Tool:
- Article – Ryan Brucks Octahedral Impostors → Billboard baker tool that can be found within Unreal Engine
- Youtube – Baking Materials to Textures | Live Training | Unreal Engine → Live Training video about how to bake materials to Textures, where I found the console commands to dump the GBuffer layers and save them as HDR
- Unreal Forum – Scene capture doesn’t render post process → Response from user “Speido” helped me set up the SceneCapture2D correctly to render the Post Process Material to the Render Target
- HLSL Material note to Return SceneTexture
- Article – Unreal Engine 4 Custom Shaders Tutorial – Using the SceneTextureLookup Function → Article on how to create custom shaders using HLSL, helped me set it up for the PP Material
- Unreal Forum – custom node: return SceneTextureLookup(uv,14,false) not working → to fix the “use of undeclared identifier” error
- Unreal Forum – Draw Material To Render Target node has inverted alpha → Response from user “RVillani” (last reply) helped me store the alpha in a Render Target correctly
- Youtube – Unreal Engine 5 Rendering Ambient Occlusion with Post Process Material → How to get AO working when using the SceneTexture node in a Post-Process Material
- Unreal Forum – Get Emissive Color as Scene Texture → Tip on how Emissive can be captured in a Post Process Material
- Unreal Forum – How do I add a delay to each iteration of a foreachloop? → Response from user “Nebula_Games_Inc” contains a video that shows how to add a delay to the engine’s For Each Loop node (make sure you are duplicating the macro and not editing the original Engine one)
- Hide Actors from SceneCapture2Ds
- Unreal Forum – Hiding certain objects from being drawn on a camera or SceneCapture2D object → Hide Actors using “Hide Actor Component” node
- Article – Unreal Engine 4 Cel Shading Tutorial – Isolating the Cel Shader → Hide Actors creating a mask using the Custom Depth Pass technique

Leave a Reply