Intro
I wanted to collect together and share some tips I think would be useful for anyone who needs to work with Sequencer in Unreal Engine. It’s really just a collection of random things I learned working on shot-based projects that I wish I had known beforehand.
This post might be useful for any beginner or anyone
I will be covering how you can expose, have control and update blueprint variables in sequencer, as well as some extra considerations on that, I will also show some limitations I found about spawnable Actors, and some tips on how you can animate cameras and how to make that process easier for yourself.
Here’s a preview of what I will be creating, but there is more stuff I’ll show that is not included:
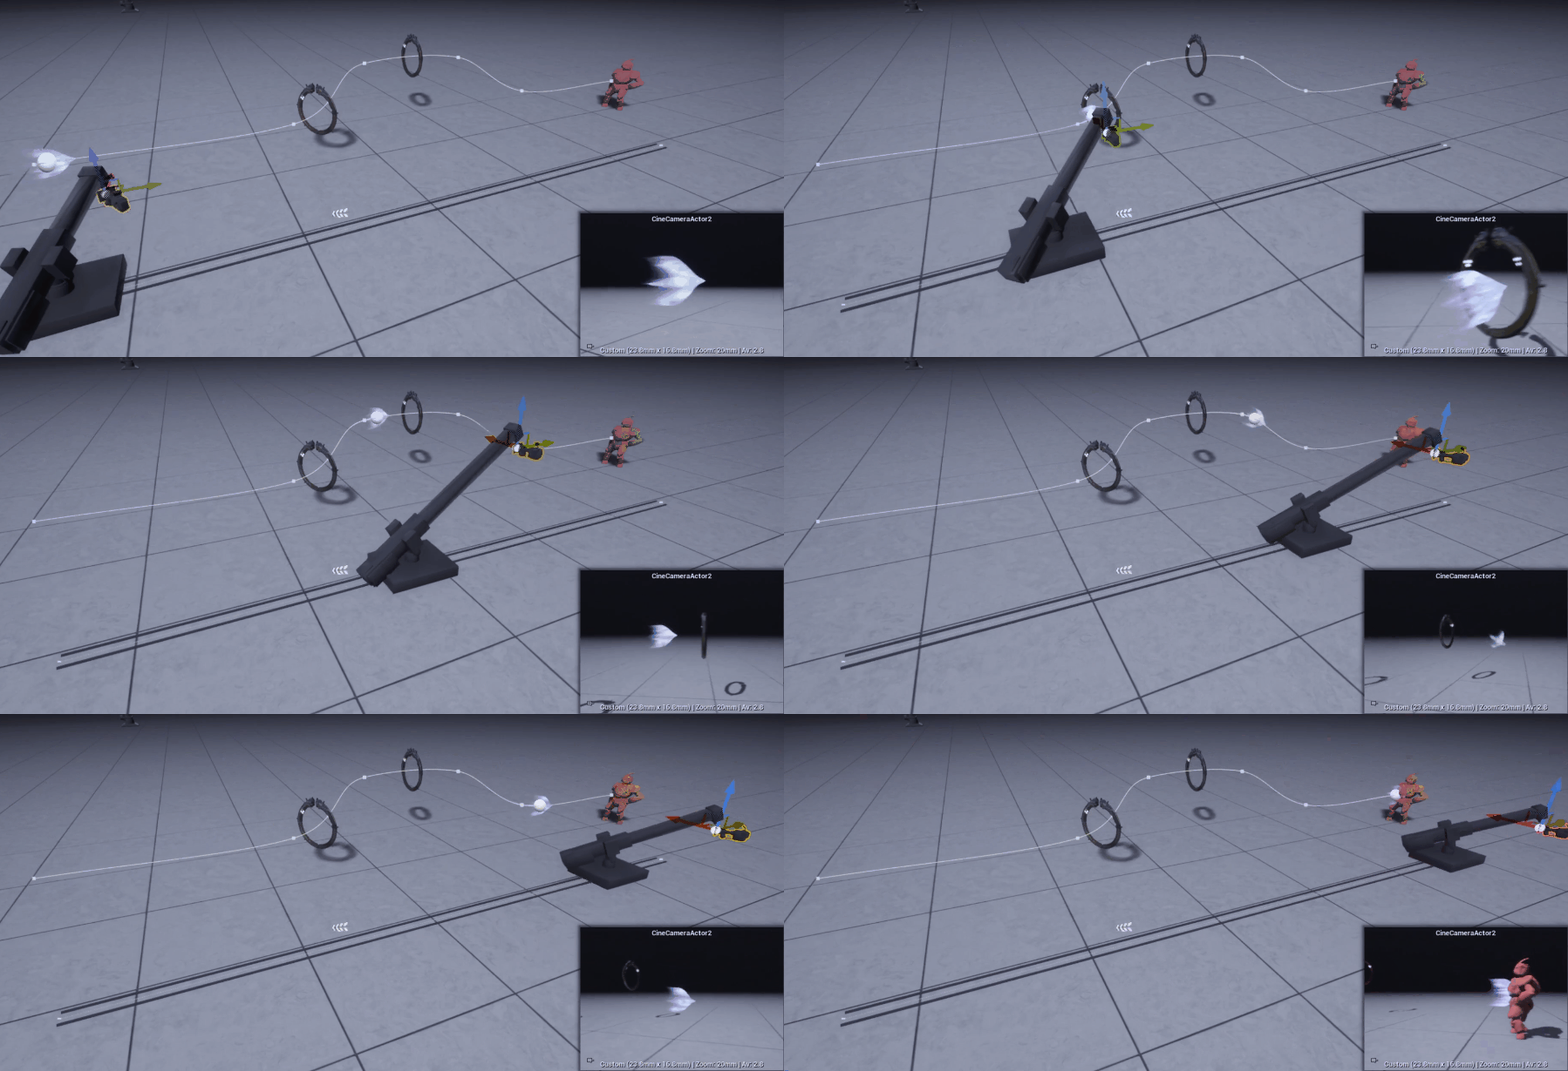
- Edit and update Blueprints’ variables in Sequencer
- Attach Actors to Blueprint’s component
- Cine Camera, Camera RigCrane and Rail combo
- Multiple viewport workflow tip
- Spawnable Cameras in Camera Cuts gotcha
- Spawnable Blueprint, edit Components’ details
(you can find links to each section in the Table of Contents at the top of the page)
Edit and update Blueprints’ variables in Sequencer
In the example, I’m creating I want to animate an actor along a spline.
To do that I made a blueprint where a Spline is the root and a Scene component, that I called “Mount”, is attached to it. The idea is to use the spline to define the path and animate the scene component in sequencer updating its location, making it ride the spline.
I also added a sphere to Mount, so that I can visualize and debug its current location.
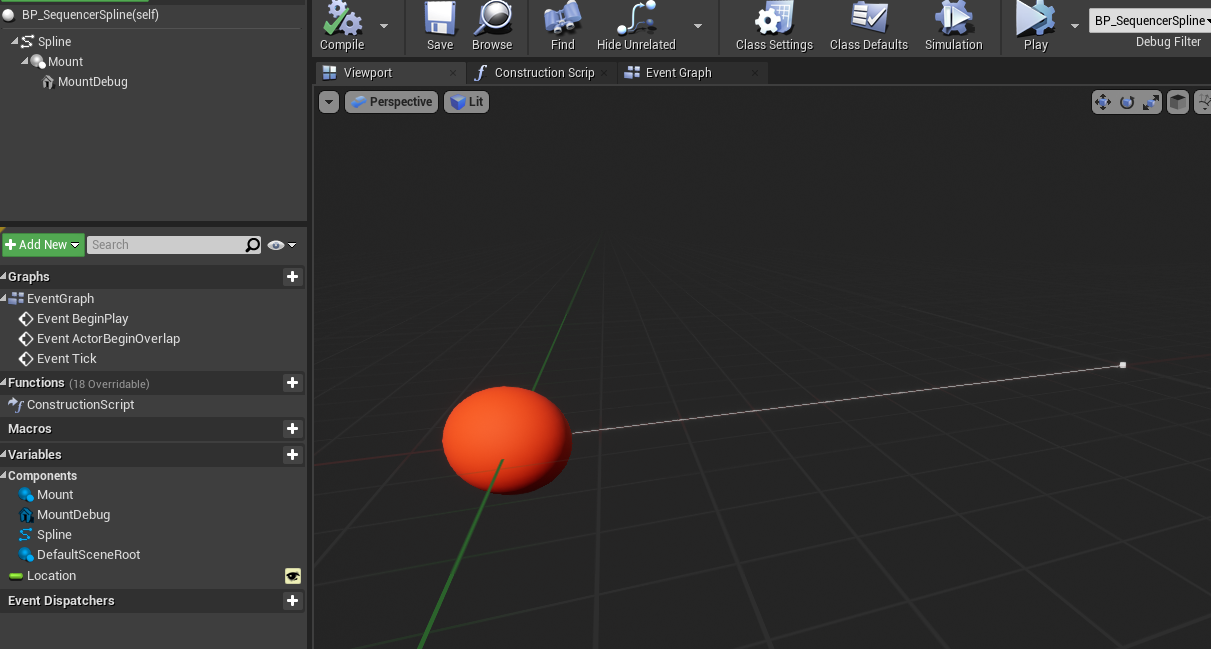
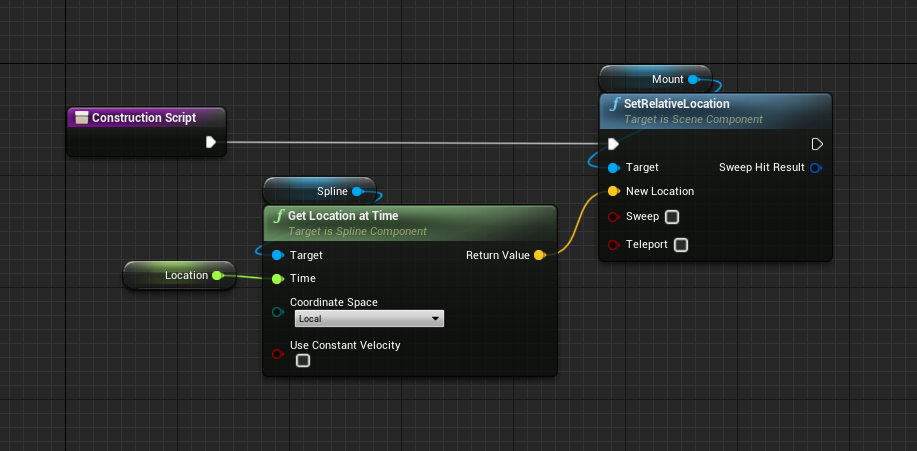
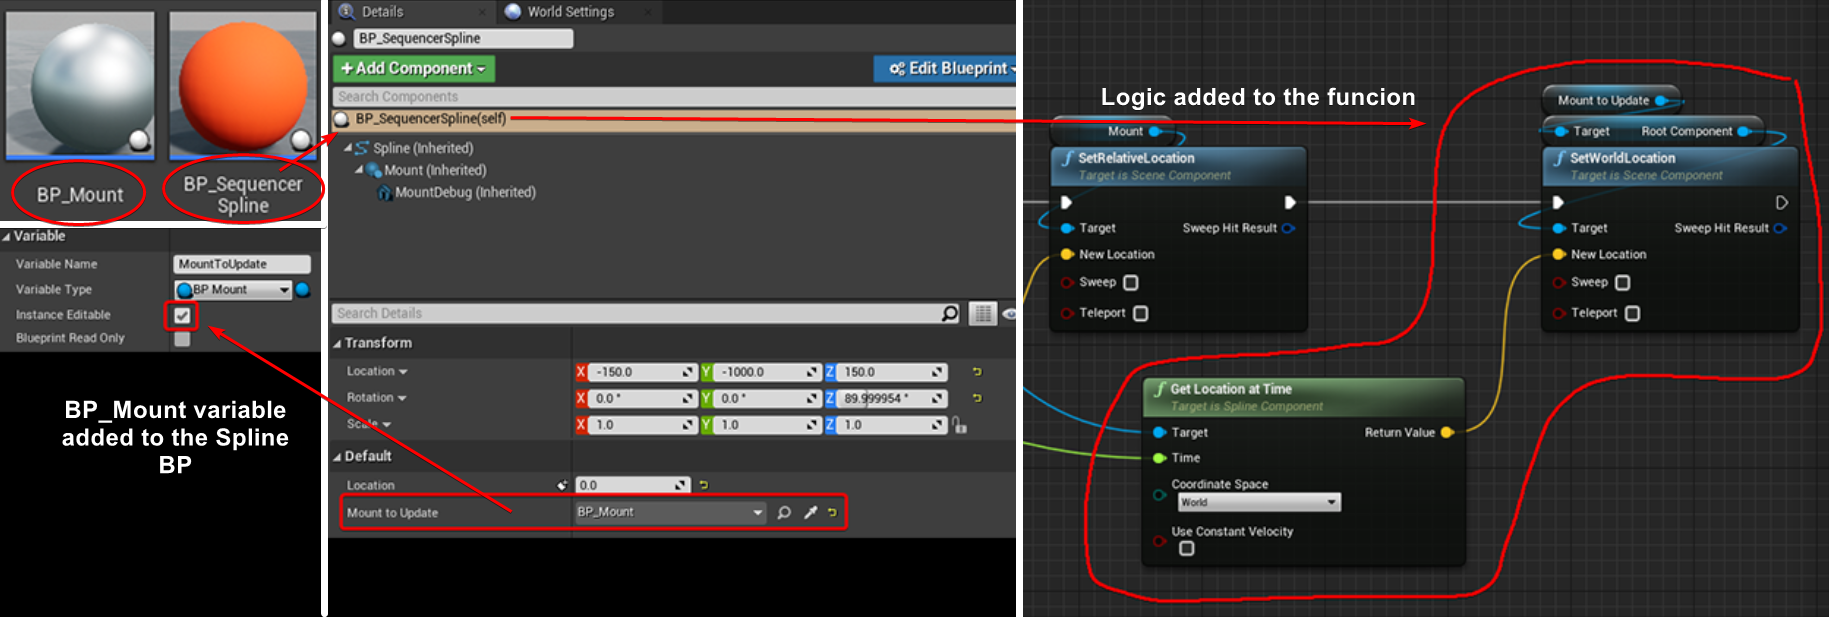
To update Mount’s location using the spline I just set its relative location using a “Get Location at Time” node in the construction script and exposed time using a float variable, this way I have a normalized 0-1 control.
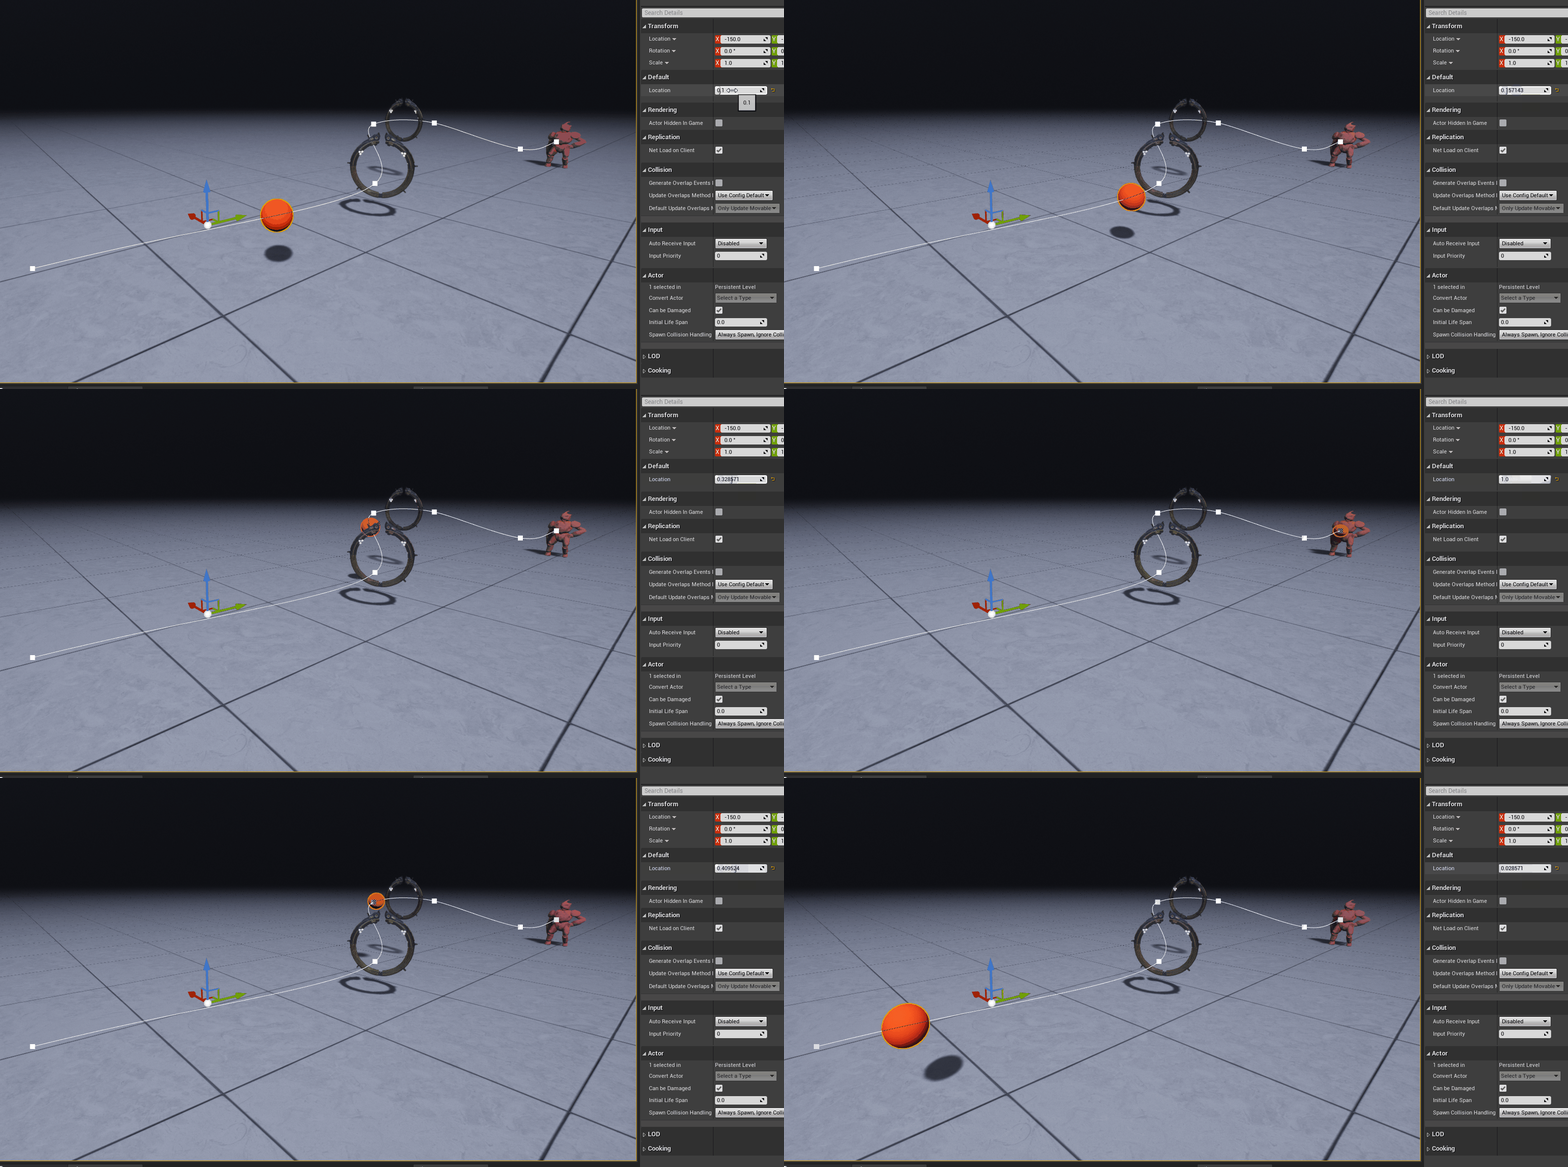
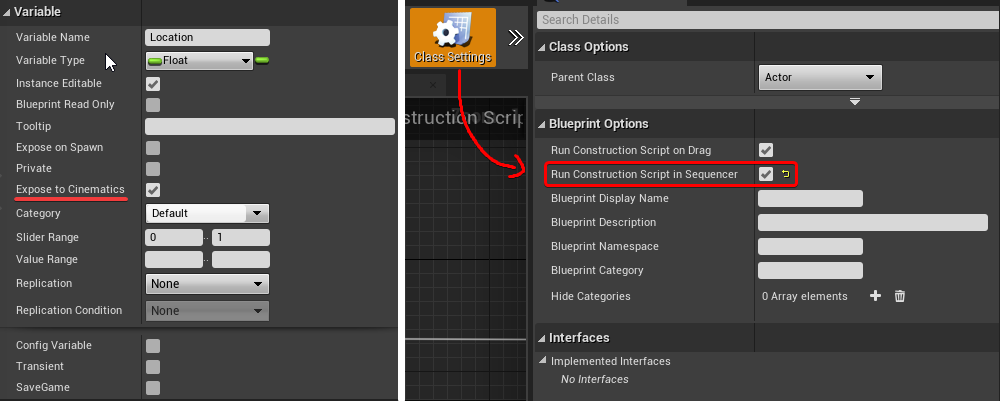
To make the variable editable in Sequencer you need to turn on “Expose to Cinematics”.
However, doing only even if you add keyframes to the exposed variable in Sequencer, nothing will actually happen in your viewport because the logic used to update the location of Mount runs on the construction script. Luckily there is a way to re-run the construction script while scrubbing through the timeline, just go under “Class Settings” and turn on “Run Construction Script in Sequencer”.
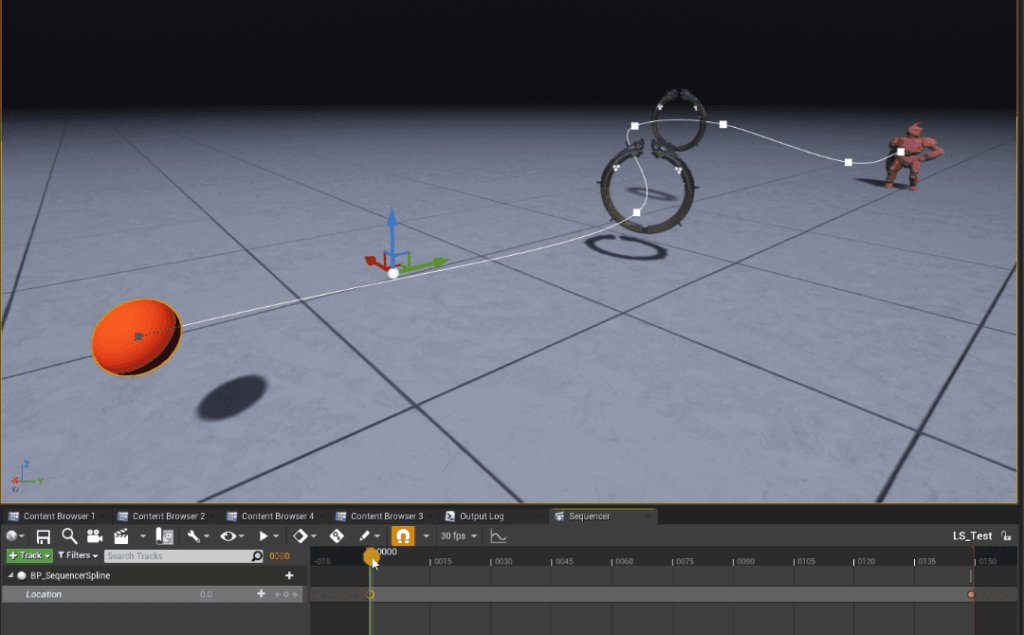
Now Mount moves along the spline in the viewport, but if we drag the Sequence in the level, set it to autoplay and simulate, the Sequence will start to play but nothing will happens. This is because Mount’s location gets updated only in the construction script, but to have it move at runtime it needs to be updated on tick.
So what I did was to collapse the logic to a function and have it run both in the Construction Script and on EventTick.
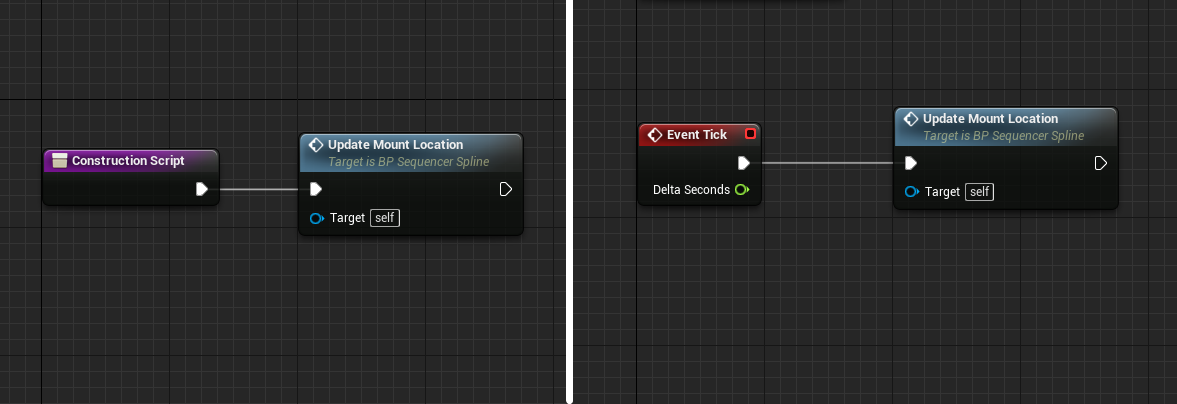
I’m not sure if this is the best way approach, if anyone has a smarter way of integrating blueprints with sequencers please reach out!
Attach Actors to Blueprint’s Component
Now that the Spline blueprint is set up, any actor can be attached to the blueprint component Mount directly through sequencer.
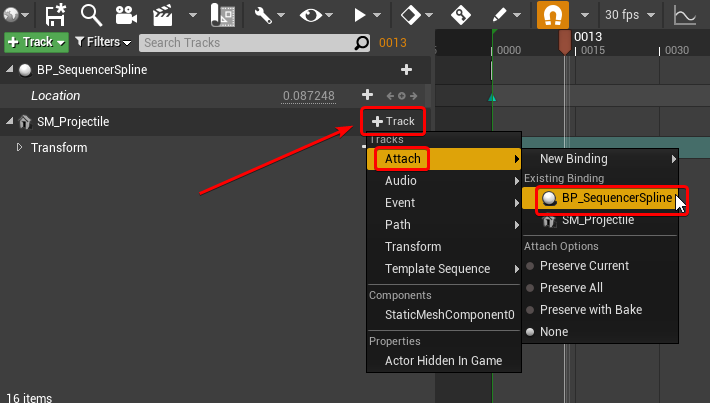
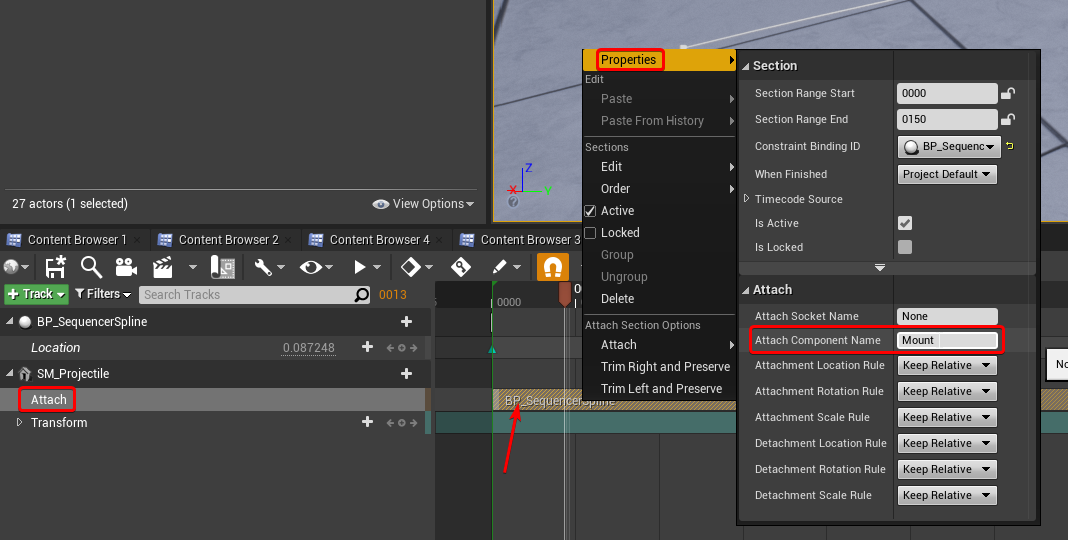
For this example I’m attaching a simple Static Mesh, just reference it in the Sequencer click on add Track, go under the Attach menu and choose the desired blueprint.
Then right-click on the attachment track of the Static Mesh, select Properties, and fill up “Attach Component Name” with the name of the desired component, in this case it will be “Mount”. Here you can also change the attachment transforms rules if needed, I found setting “Attachment Location Rule” to “Snap to Target” helped get consistent results.
After that’s done the Static Mesh should move along the spline while playing the Sequence. However, you probably noticed that while scrubbing back and forth in the timeline it looks like the Static Mesh is offset by one frame compared to the debug sphere.
In the gif below I’ve attached a green cube, you can see that in the first frame the location of the two meshes matches perfectly but when I start moving in the timeline, at the first frame the cube remains still and then follows the red debug sphere with a delay of one frame.
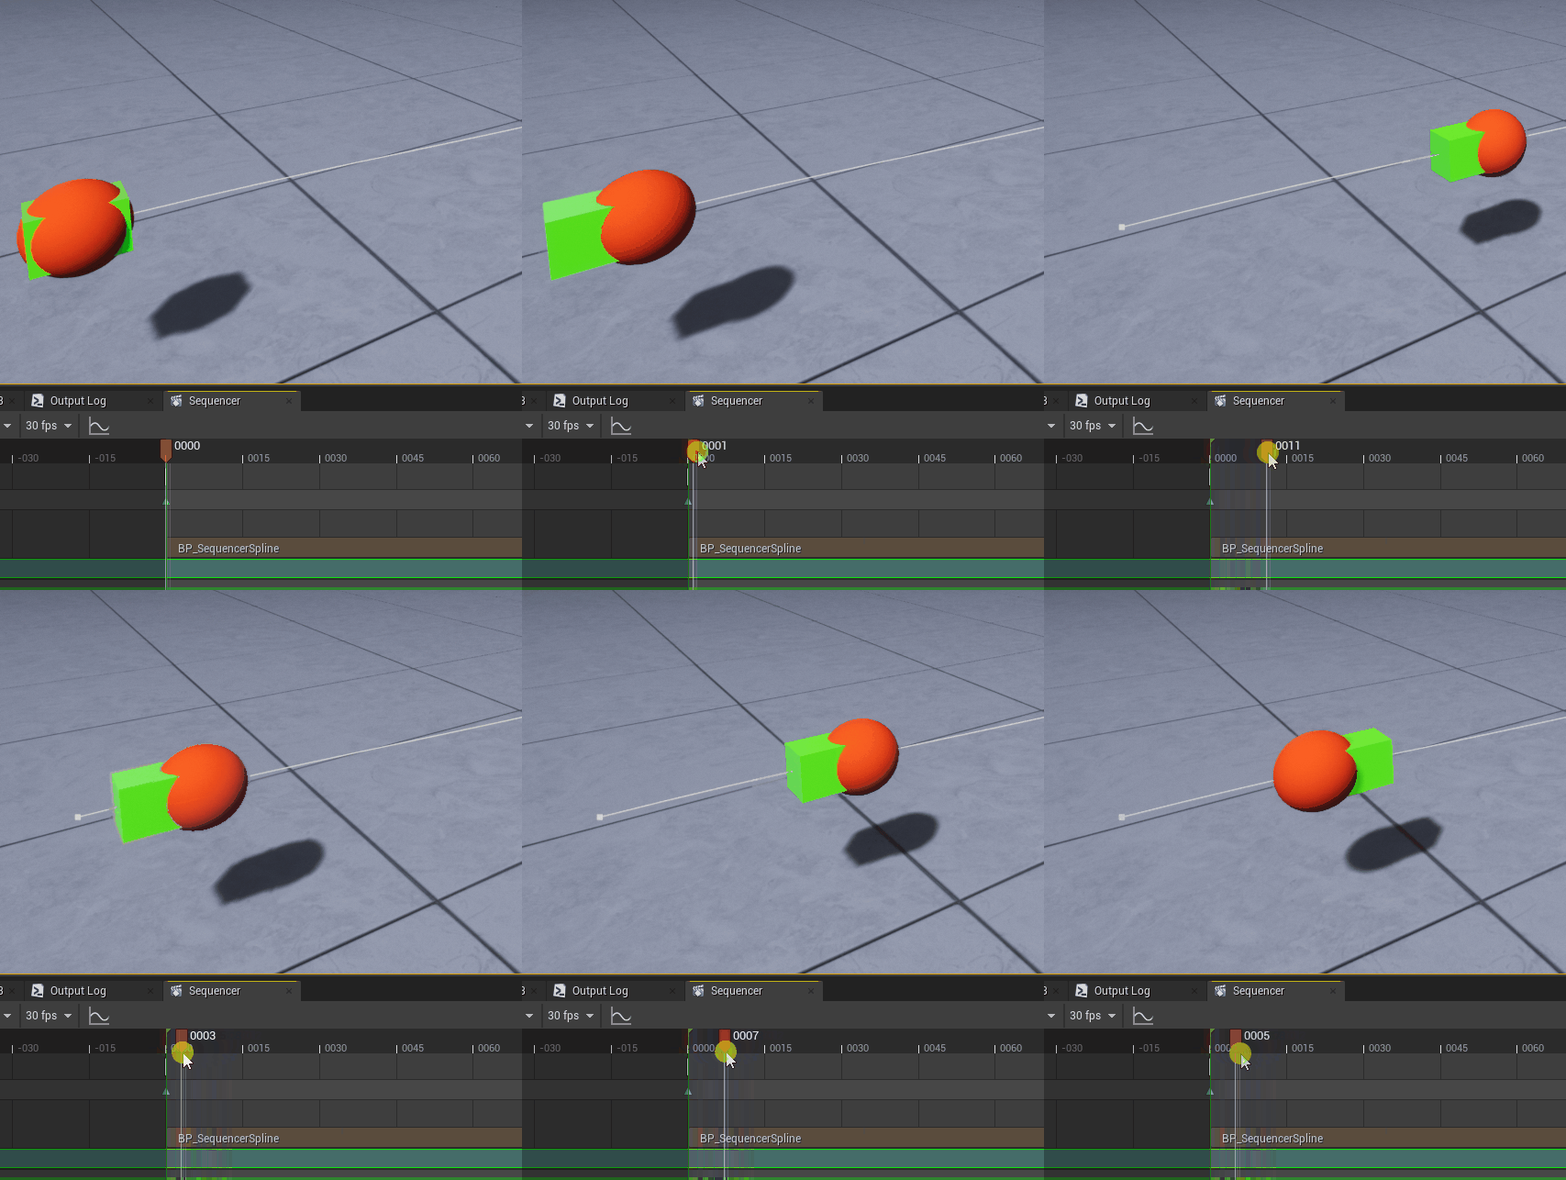
I’m not sure why this happens, but a workaround I found was to avoid attaching the static mesh to the Mount BP_Spline component and instead separate Mount from the Spline Blueprint.
The new BP_Mount is referenced by BP_Spline, so that the mount location can still be updated. Then you can attach the Static Mesh that needs to follow the spline directly to BP_Mount.
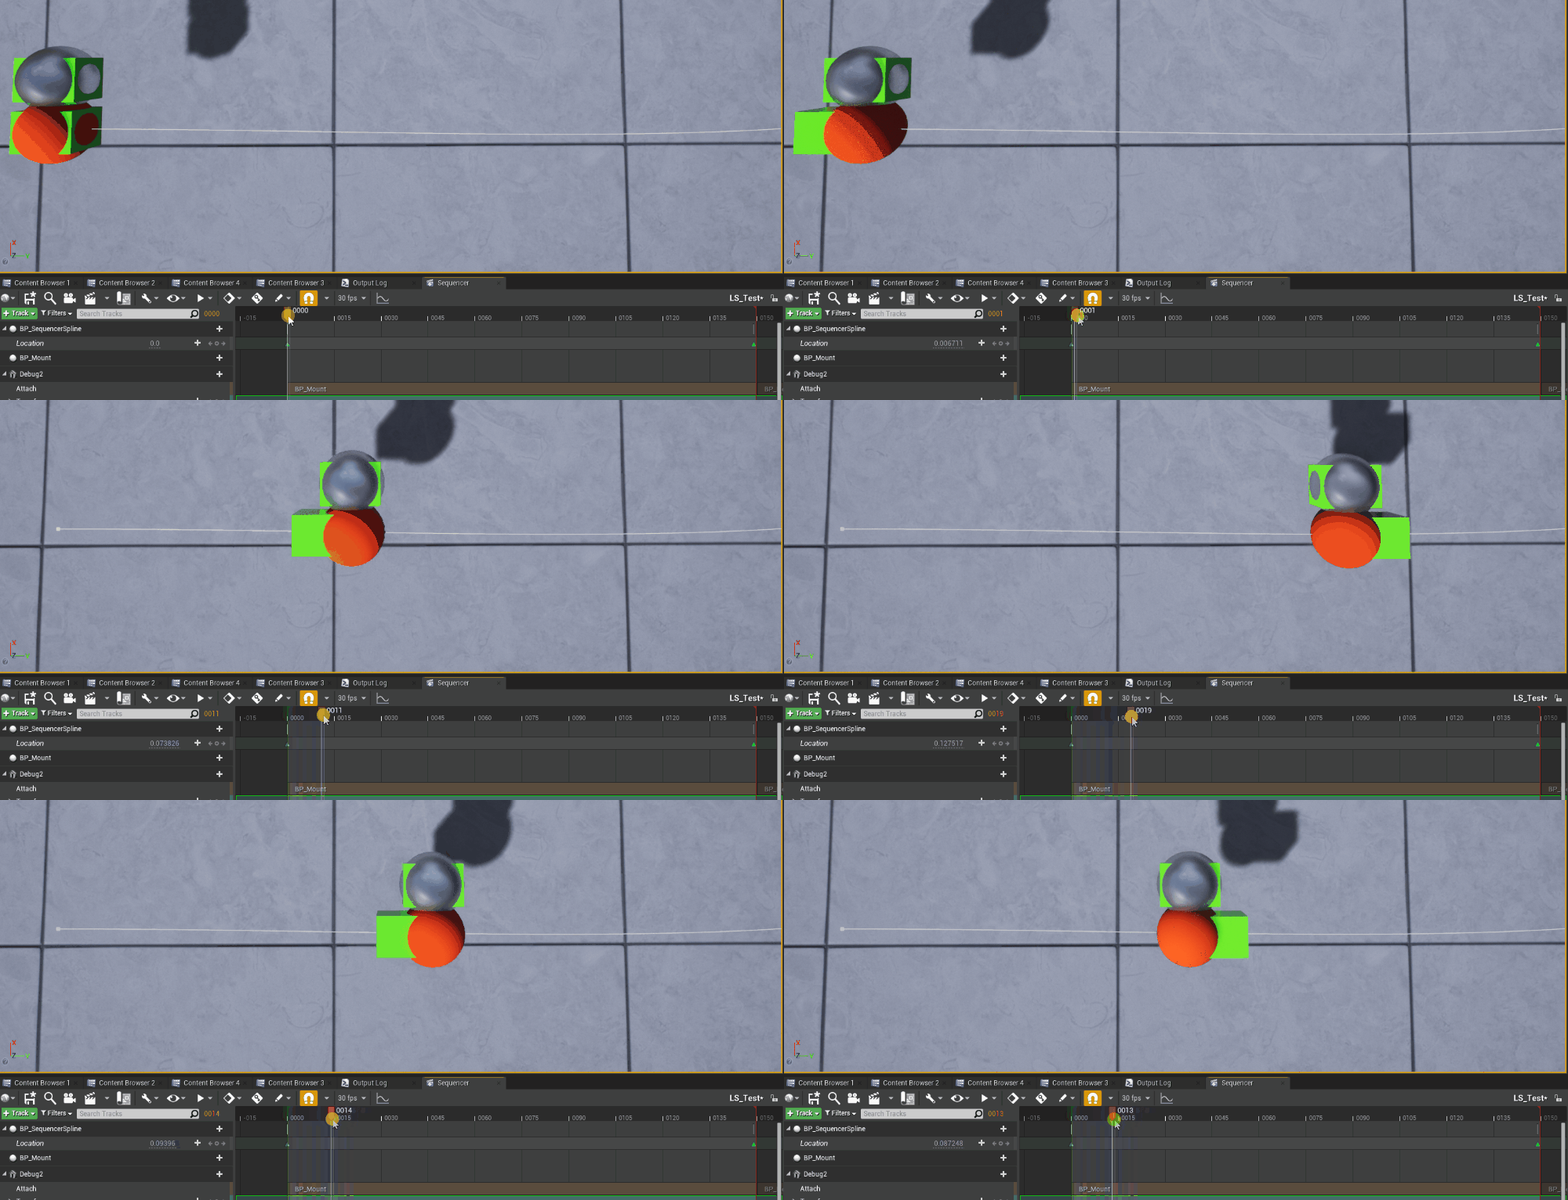
The gif below shows the result in the viewport. The silver sphere is for debugging the location of BP_Mount, it has a little bit of offset in the X-axis to visualize it better. I’ve also duplicated the green box and attached it to BP_Mount directly to compare the two final results
The test renders results are quite interesting tho, below you can see the render done using the normal sequencer renderer, the Static Mesh attached to BP_Spline’s Mount component is completely broken and doesn’t move.
However, when using Movie Render Queue both alternatives give the same exact result.
So if you’re using MRQ this extra step of having the Mount as a separate Blueprint is only useful to review the correct location in the viewport.
gain if anyone knows more about this issue please reach out!
Cine Camera, Camera Rig Crane and Rail combo
I’m not going do to an in-depth dive regarding this, you probably are already aware of the Camera Rig Crane and Rail, but remember that they can be used together, attaching a Cine Camera to a Crane and then move the Crane along the Rail. You can get rapidly excellent results with this method since it allows you to control the location of the camera very easily, as well as keep full control over its relative rotation.
For more information check out the documentation of both the Rail and the Crane.
You could argue I could have used the Rail Actor to animate the projectile along a spline, and you would be right.
The reason why I made a custom blueprint it’s because that gives you a starting point to create something more complex, also you might have a spline system already in your project. In the past, I found this technique useful because I could use a Catmull–Rom spline I made.
You can also attach the crane to the spline used by the Projectile, to have a camera that follows the action.
I mentioned I could have used the Rail actor to animate the projectile, the same applies for the Crane, static meshes can be attached to it as well. Here’s a spooky floating head that I quickly animated using the Crane, and try to overlook the fact that I’m not a good animator.
Multiple viewports workflow tip
When working on Sequencer’s animations I prefer working with 2 viewports so that I can freely navigate the 3D space in one of them, while having the other one always locked to the Cine Camera so that I can always check the final result.
The best way to do that is by turning off “Allow Cinematic Control” on one of the viewports in the viewport’s options, this way when clicking on “Lock viewport to Camera” in Sequencer’s Camera Track only one of them will be affected.
Unfortunately, it needs to be done every time the engine is restarted.
Spawnable Cameras in Camera Cuts gotcha
This is a weird one and it only applies if the camera is Spawnable and not when they are Possessable.
When working with spawnable cameras make sure you add them to the Camera Cuts referencing them from the Sequence and not the World Outliner, the two images below show the right way of doing it:
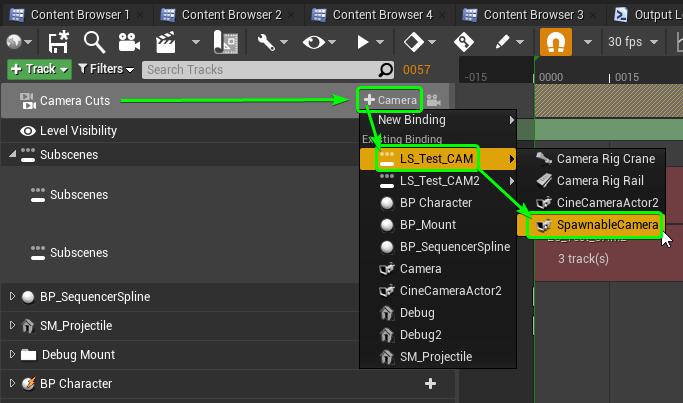
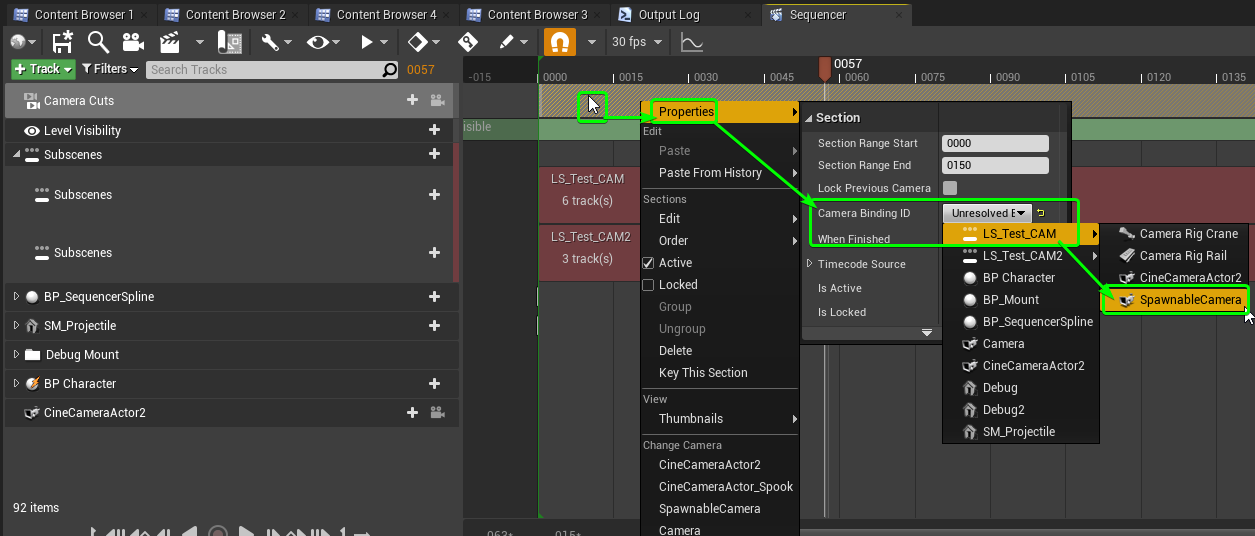
Avoid selecting them using “New Binding” when clicking on the + button, or selecting them from “Change Camera” section if you are replacing the existing one by right-clicking on the track.
The two images below show the wrong way of doing it:
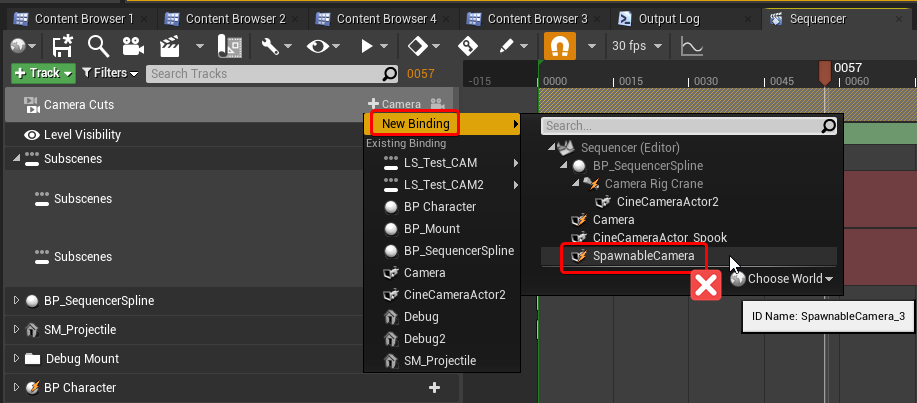
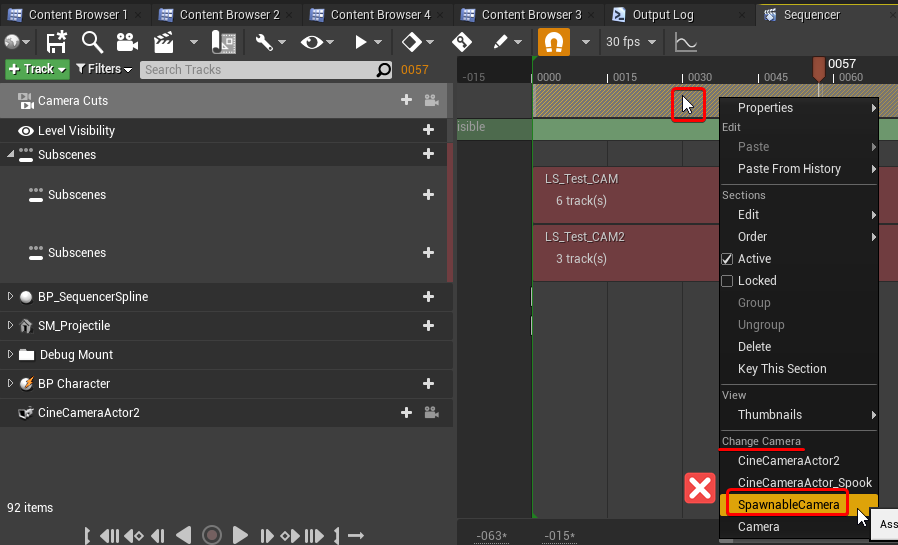
This is especially a problem if the camera is not in the same Sequence of the Camera Cut, but it’s instead in a sublevel. If done in the wrong way the Sequence will look for the camera in the World Outline and the reference will be lost the moment the camera is despawned.
You can notice straight away if you are doing it right or wrong, because if you are doing it wrong a reference to the camera gets added.
Below you can see an example of the issue.
Spawnable Blueprint, edit Components’ details
I encountered this limitation when I had a spawnable blueprint with a character inside it and I needed to replace its assigned materials, the changes didn’t save. This applies to any parameter in the Details tab, not only materials.
The video below showcases the problem:
I saw that right-clicking the actor there is a “Save Default State” option, but it doesn’t seem to do anything and I couldn’t find more information about it.
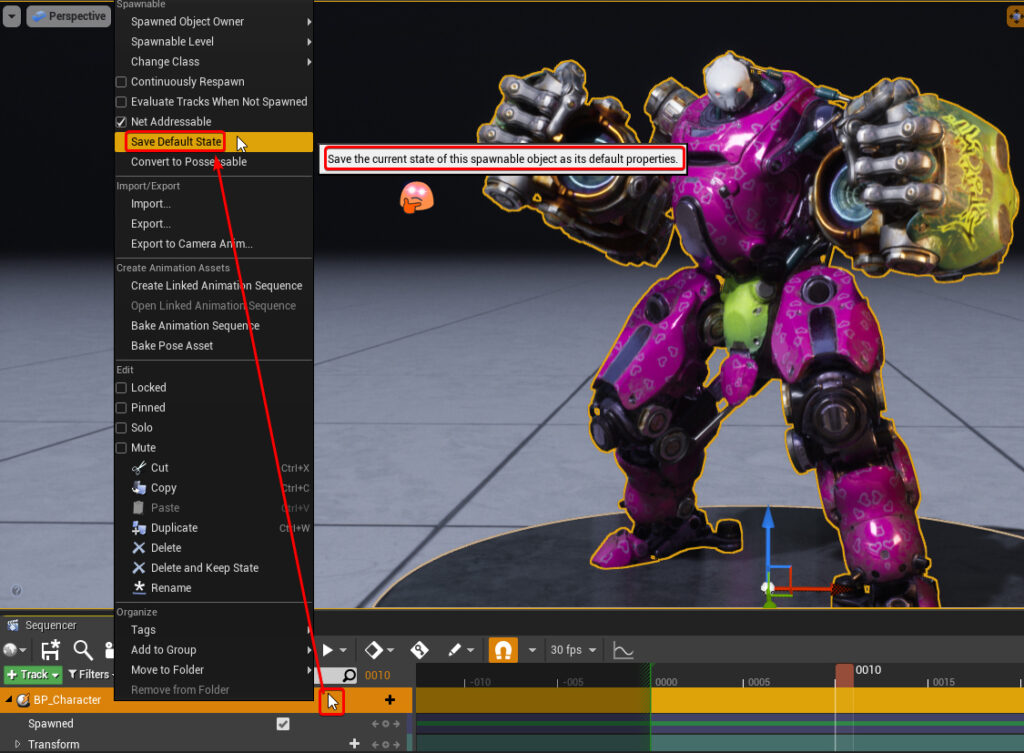
There are two solutions to this problem, you can either just covert the actor to Possessable so that it lives in the level and any changes done in the Details panel get saved in there. Or, if it needs to remain Spawnable, the materials can be set in Construction Script.
This brings me to another exploration I’ve done, where I tried to create a dynamic, but still editable, array of materials. Making the parameters as user-friendly as possible, adding features like:
- set the array’s length based on the Skeletal Mesh in use
- populate the empty slots with the Skeletal Mesh’s default materials
- store the materials the user inputs
- set custom presets to use as defaults
However, I’ve covered that in another blog post.
I hope someone found this useful!
The assets used for this article are from Paragon’s free content on Unreal Engine’s Marketplace

Leave a Reply