Introduction
In this article, I will be mainly focusing on Anim Notifiers in the context of spawning FXs; you can probably apply the same concepts to other needs too. I decided to make it because I couldn’t find any information about this process anywhere online. I really hope it ends up being useful for someone!
The first problem that I’ve encountered, and that I’ve tried to solve, is the ability to expose Niagara User Parameters on the Anim Notify, which allows the Niagara System spawned to be more flexible and reusable. This is something that is not exposed by the provided “Play Niagara Particle Effect” Anim Notify.
After that, I’ll explore a way to handle a Niagara System using an Anim Notify State by spawning and deactivating it. As well as sending parameters updates to it using separate anim notifiers, and the caveats, problems, and workarounds I’ve found with it.
Everything that I’ll show relies on creating custom Anim Notifiers through Blueprints!
Set Niagara User Parameters
Prepare Blueprint
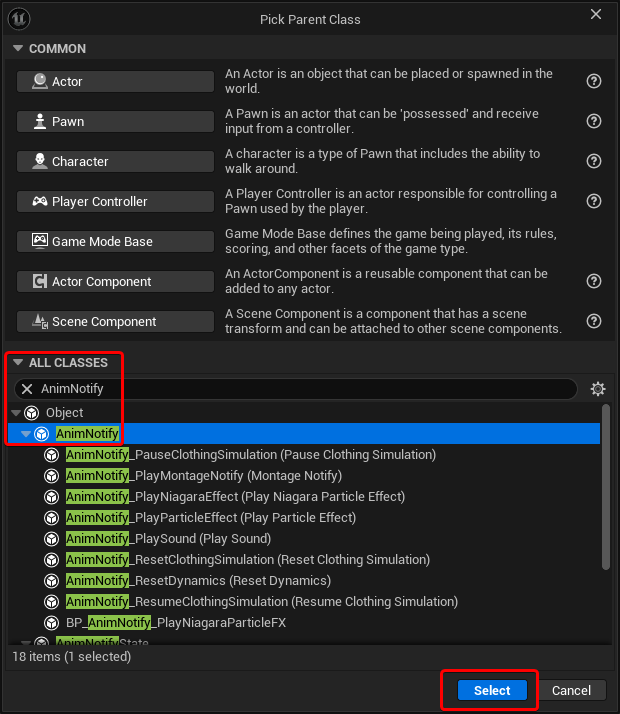
First things first, we need to make a new Blueprint, using the AnimNotify class as the parent. I’ll call it BP_AnimNotify_PlayNiagaraParticleFX, so that it shows up when searching for the engine provided Play Niagara Particle Effect, but it’s also clear that it’s something custom.
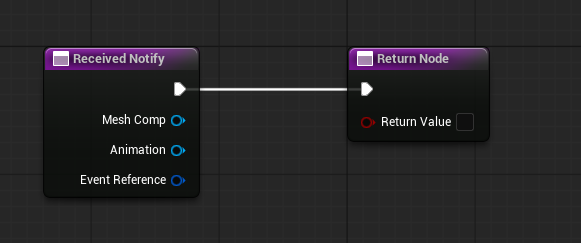
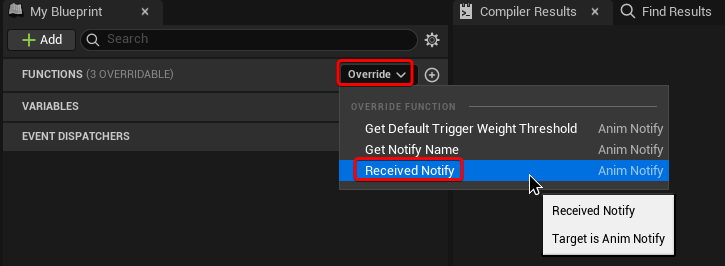
Now we have a custom Anim Notify, but it’s not doing anything. To add logic to it, we need to override the “Received Notify” function
This adds a function to the list, which contains 2 nodes, a “Received Notify” and a “Return Node”. The first node also passes through a reference to the Mesh Component that triggered the Anim Notify, a reference to the Animation itself, and also an Event Reference Struct. This last one I’m honestly I’m not really sure what kind of data it holds, since I was not able to split (please do reach out if you know). The second takes in the Execute pin as well as a Boolean “Return Value”, which I assume is the classic “success” Boolean some function passes through. However, usually Anim Notifiers are mostly used in a “fire and forget” fashion, and in the context of Blueprints, I haven’t found much use of it, but it might be different in C++.
Not “Play Particle Effect” Anim Notify?
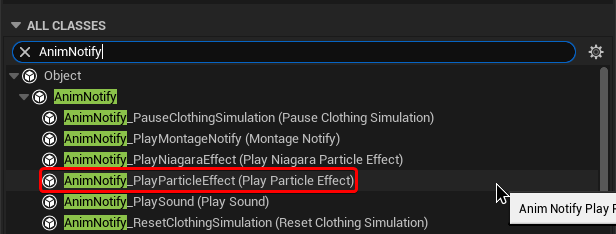
I initially thought that in order to make a custom Anim Notify that only needs to expose the ability to set User Parameters, I could simply inherit directly from the class “Play Particle Effect”, since it’s already spawning a Niagara System. However, I could not find a way to fetch the reference to the Niagara System Component that gets spawned; I don’t believe that is exposed by default.
Spawn Niagara System
Let’s add a Spawn System Attached node, use the incoming Mesh Component as the attachment, and expose both the Niagara System and the Socket name as editable variables.
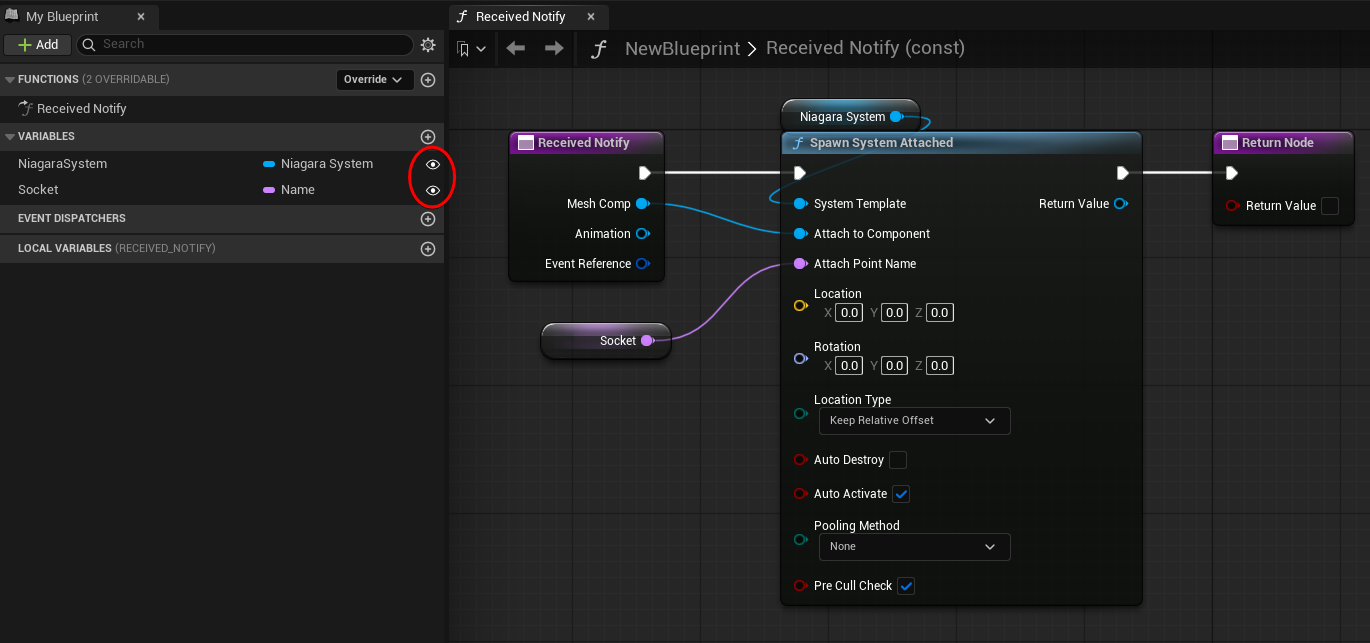
I’ve also added a socket to the Skeleton of the Mesh I’m targeting, but you could use a bone directly as the “Socket”.

Now, if you add the new notify to an animation, you should be able to set your own Niagara System and the target Socket. I’m using the idle animation for testing purposes since it’s a long clip with a lot of frames.
Set User Parameters
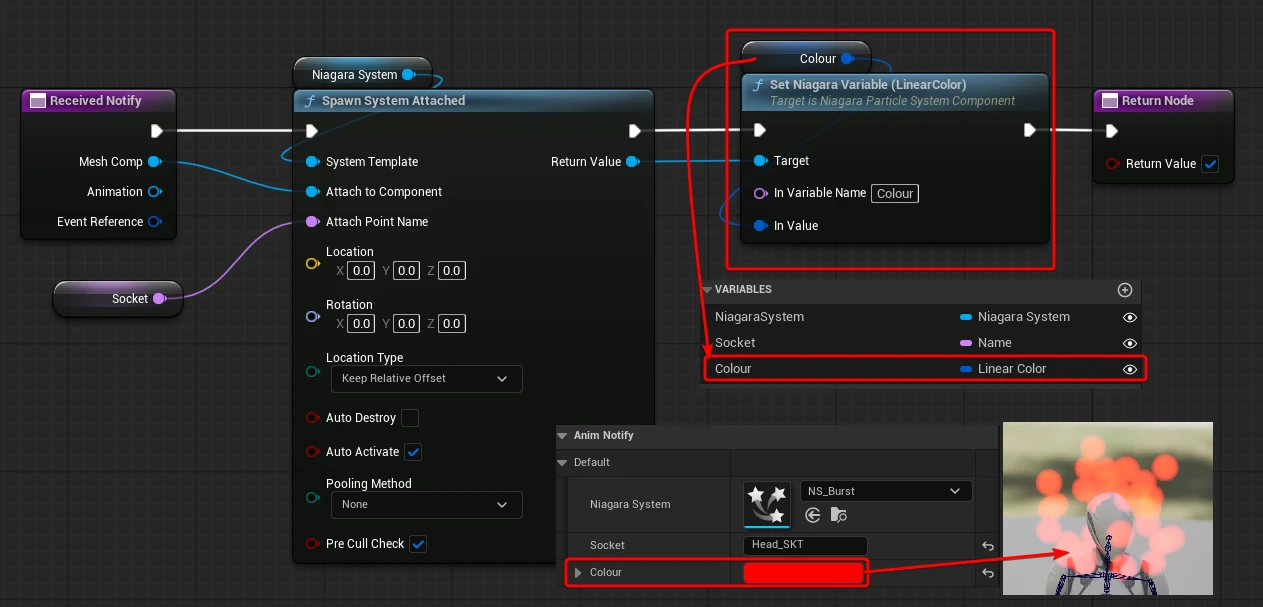
Now the fun part, we are spawning our own Niagara System, this means we can now easily expand the setup and set User Parameters on the Niagara System by exposing the values as editable variables!
Here I’ve added and exposed a Colour attribute that sets the Particle’s Colour
Being able to expose the User Parameters you need this way is very useful. However, these are hard-coded, restricting the use of both the Anim Notify and the User Parameters names used by the Niagara System you are creating.
If you want an Anim Notifier that can be used on different FXs, it needs to be more flexible.
Behold, introducing your new best friend:
Map Variables
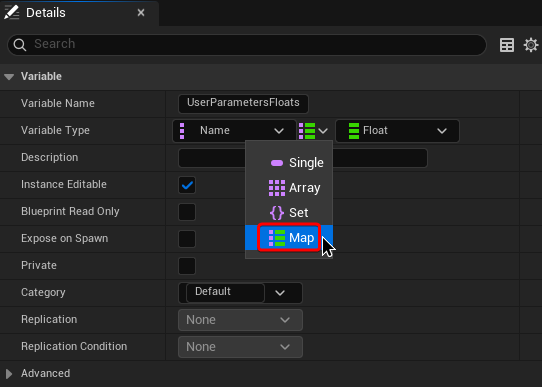
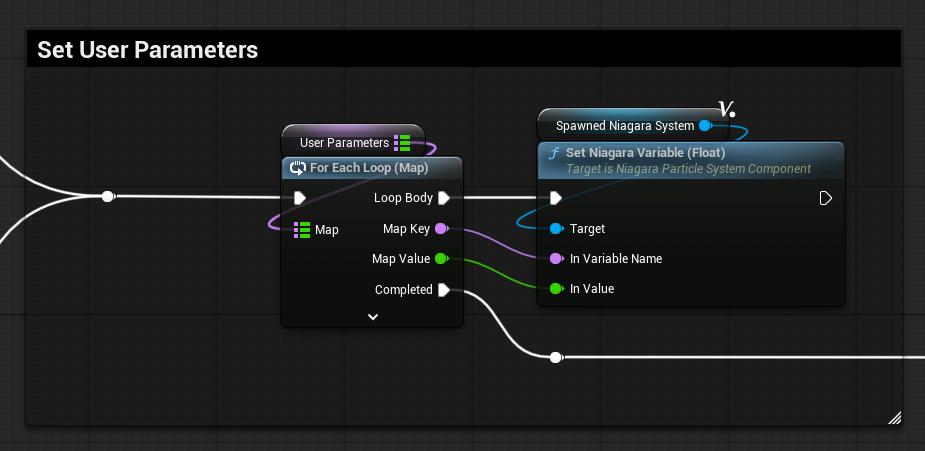
The most common User Parameter to set is floats, so I’ve set up a Variable Map that takes a Name and maps it to a Float value.
You can use a For Each Loop to go over every entry of the variable array, and set Niagara User Parameters with it
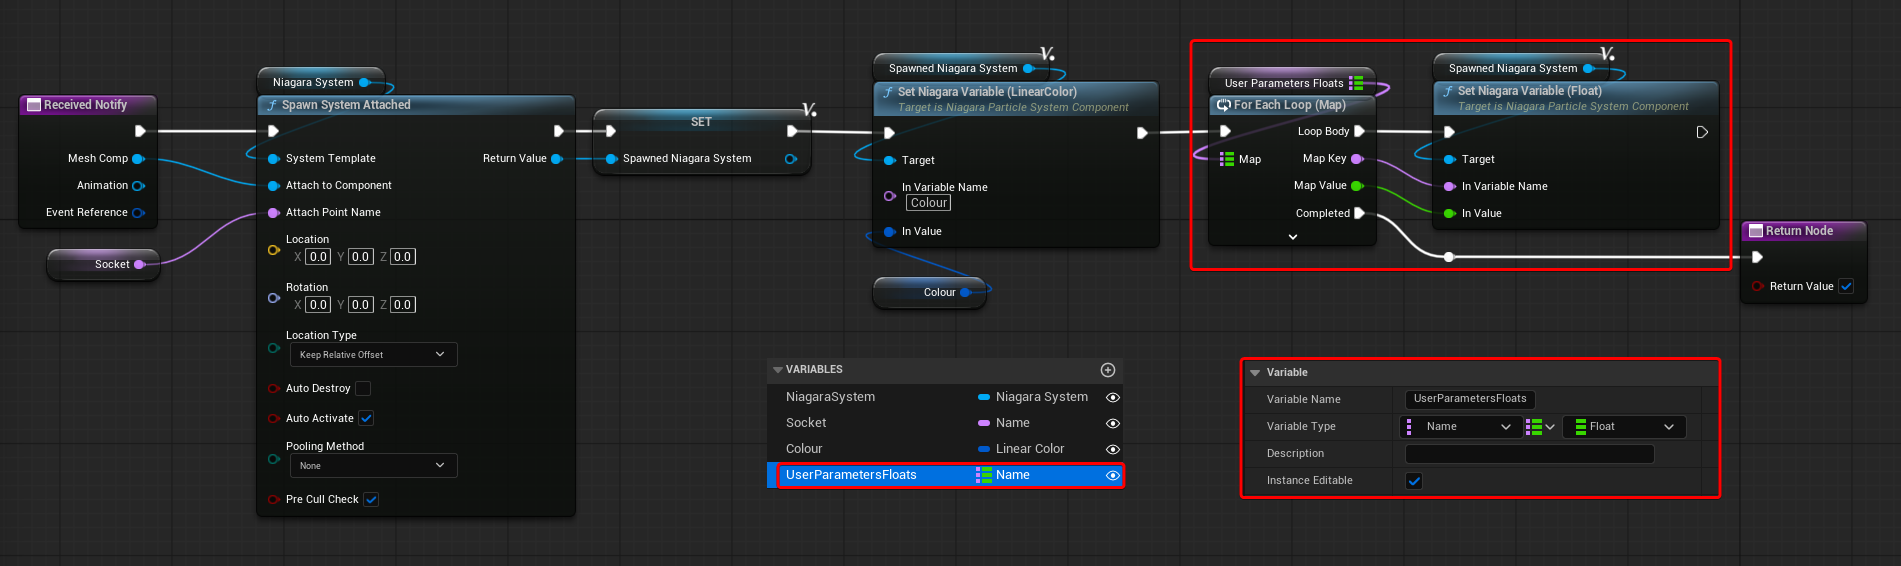
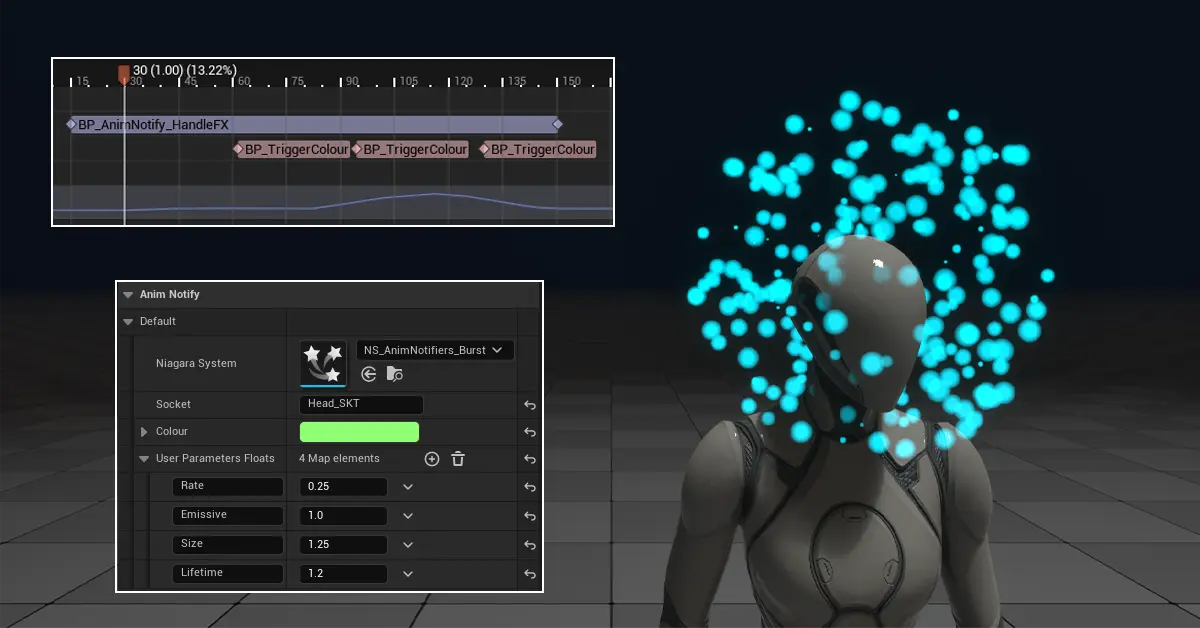
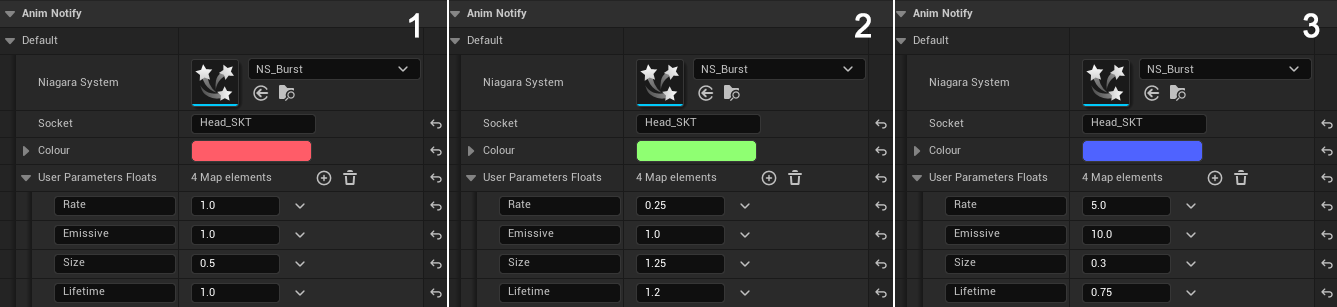
Here I’m using the same notify to set the parameters Spawn, Lifetime, Size and Emissive exposed by the Niagara System.
I’ve also kept the Colour attribute to more easily distinguish each burst.
For this example, I’ve only set up a Variable Map for Floats, but you can expand it to have other Variable types, of course. However, keep in mind that if your aim is to create a generic Anim Notify that can be used in multiple instances, starting to add all kind of parameters types it might be a little bit excessive. In that case, you might want to reconsider if they should all be included in this “Generic Anim Notifier”, or if you are better off making a more custom “Case by Case” notify.
Additional Features
What I went through in the previous section covered all the basics.
What I did after that was expanding on it based on what I think would be useful to have on this type of Anim Notify.
I’ve added and exposed a SpawnFX Boolean, this gives the ability to turn off the Anim Notify for testing purposes. Without having to delete it from the animation, which would inadvertently make you lose the exact frame on which it was placed, in case that’s important.
I’m also setting the local variable Spawned FX, which is used for the return node (as explained earlier, I’m not really sure how useful that actually is)
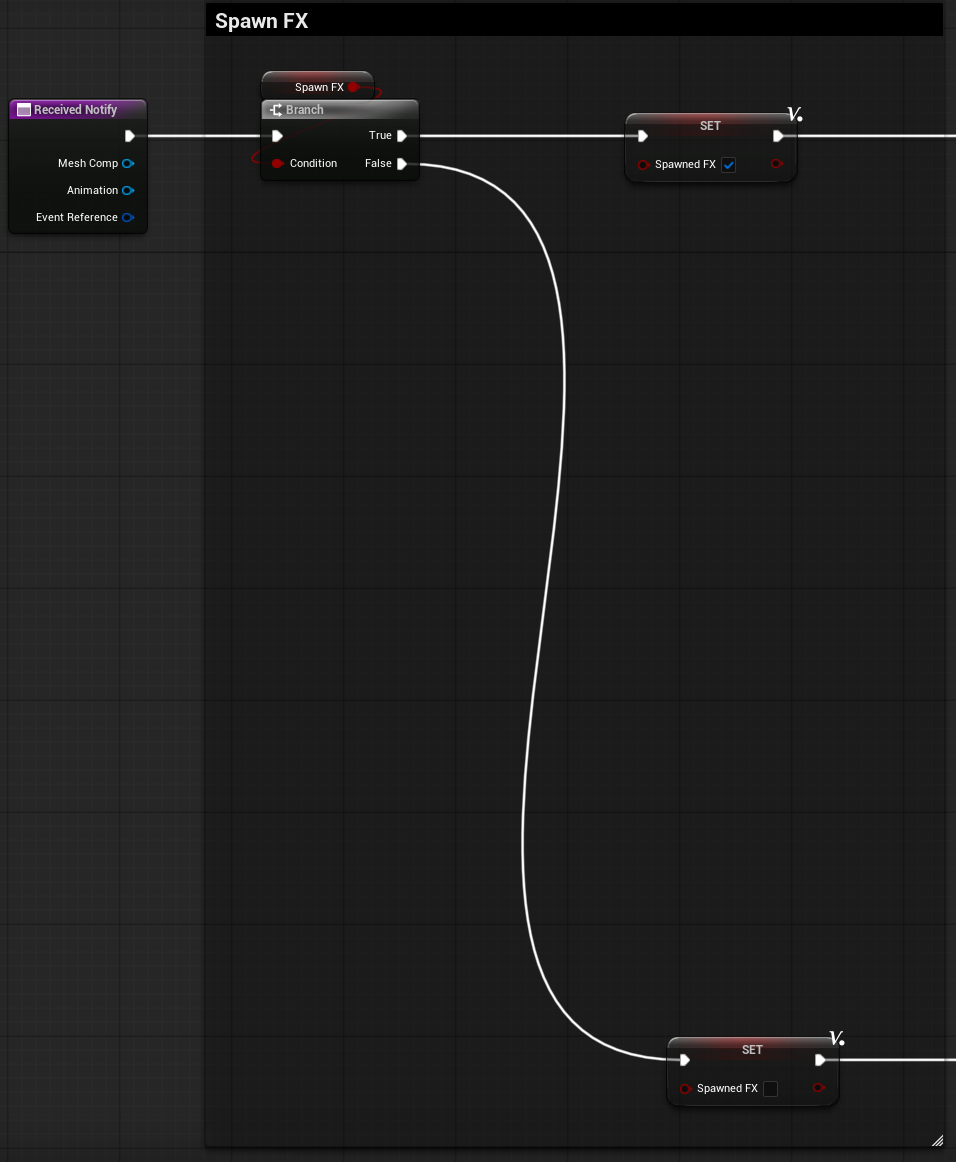
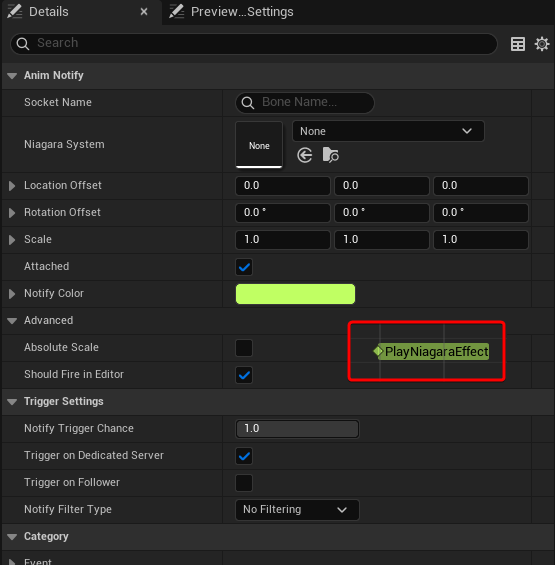
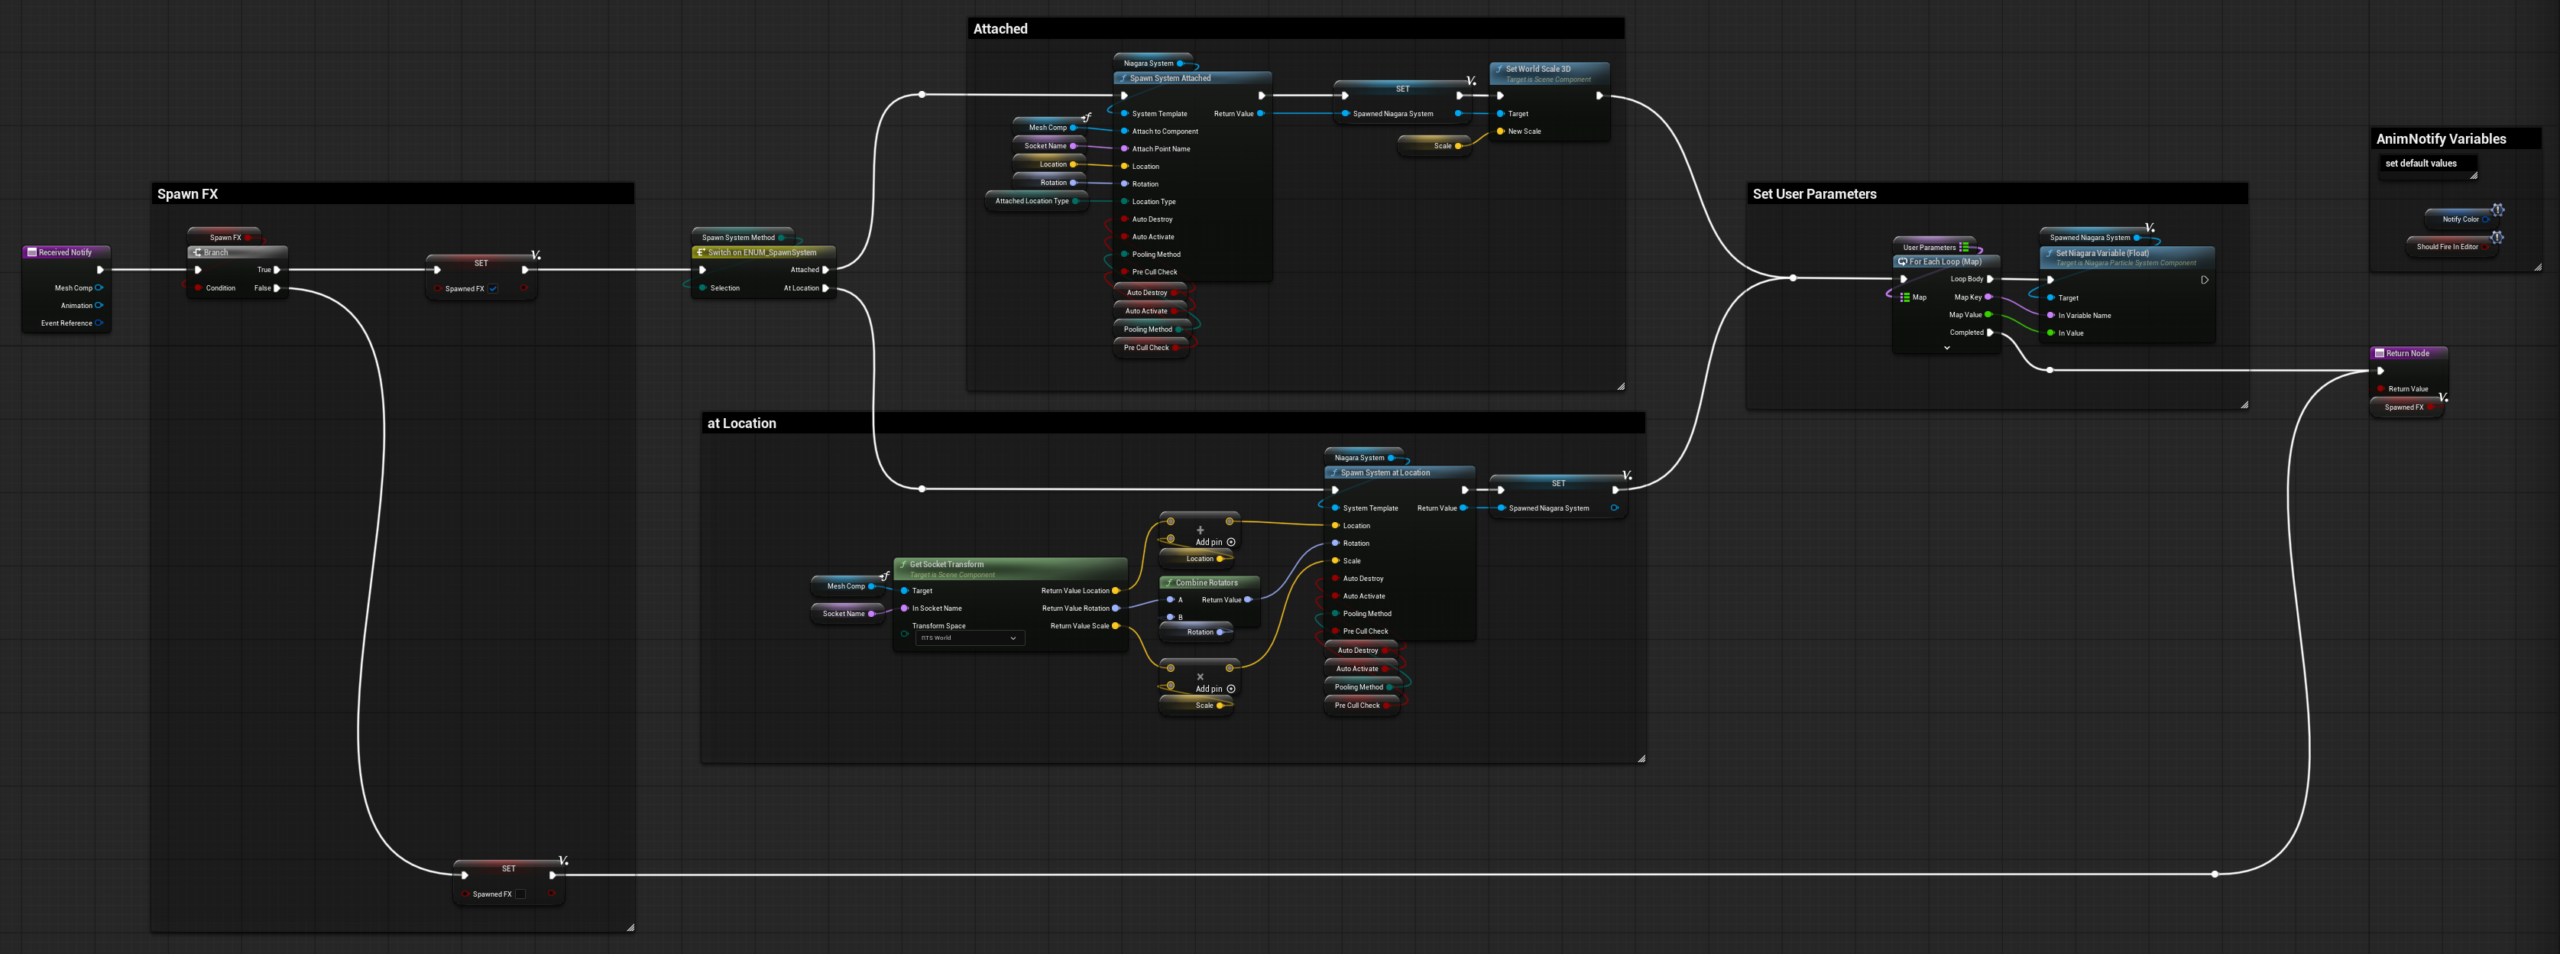
I’ve then made an ENUM that allows for switching the logic from “Spawn System Attached” to “Spawn System at Location”. The first one is the same as it was shown before, while the second one it’s using a target socket to define the transforms of the Niagara Component that gets spawned.
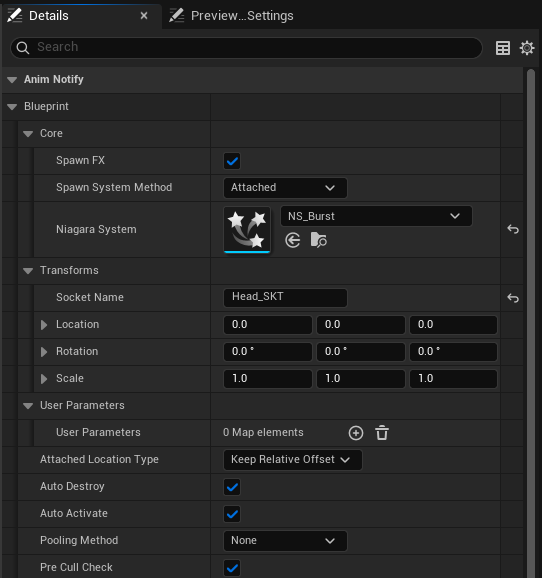
I’ve also exposed the various Transforms variables, as well as some more advanced options. If you do the same, just make sure that the exposed variables have your desired default value set.
The Spawn System Attached node does not take in a Scale variable. Because I’m already exposing it for the Spawn System at Location method, I’ve decided to just scale the component with it by adding a Set World Scale 3D node.
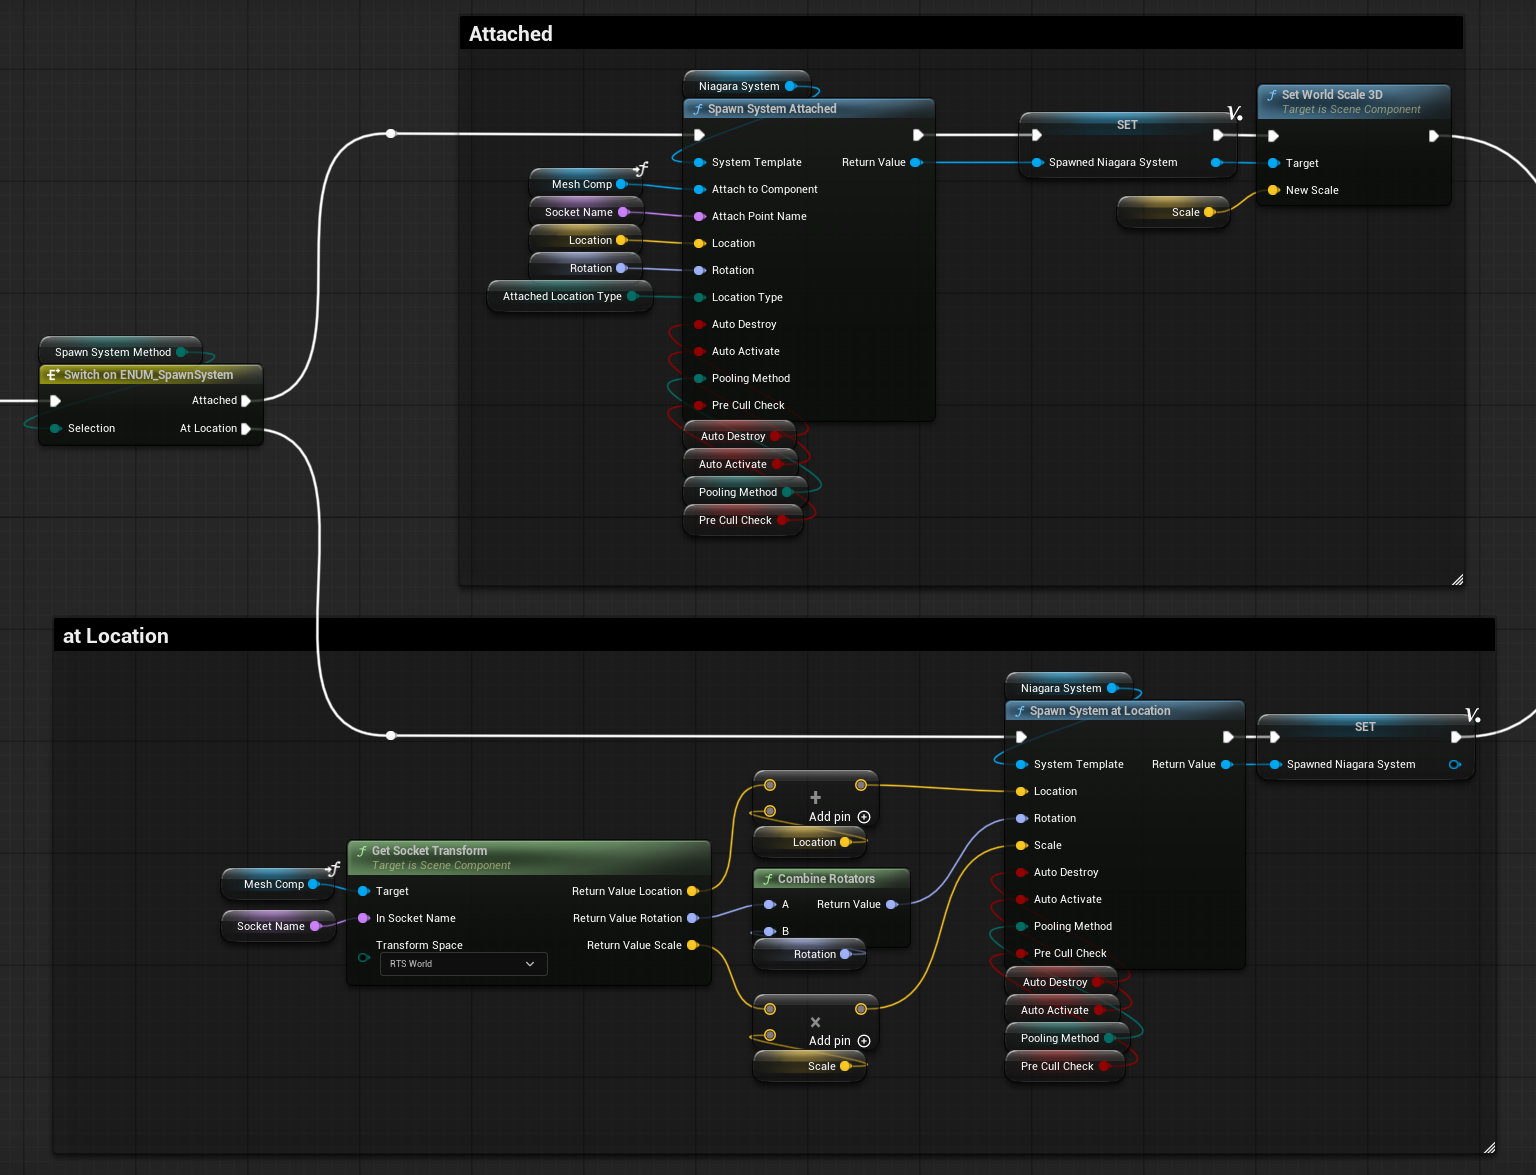
After the Niagara System Component gets spawned, both methods converge to the User Parameters Variable Map Loop. I’ve only exposed a float attribute array for now.
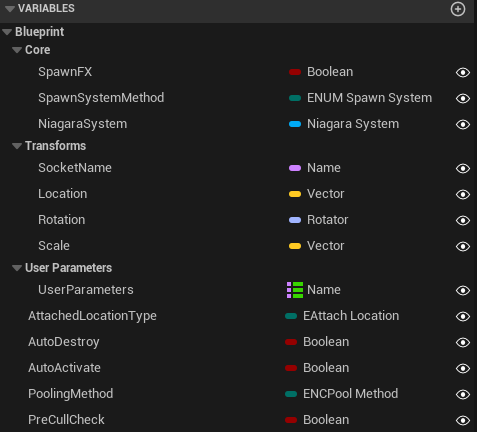
Here’s the list of all the exposed variables, the category I’ve associated them with and what the anim notify looks like in context.
Of course, this setup can be expanded with additional features.
Bonus
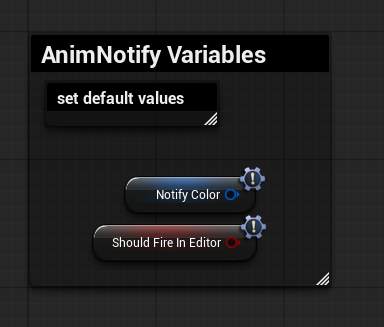
As an additional little bonus, you can place the following two variables in your blueprint graph, which are inherited by the Anim Notify class, and set their default value by selecting them.
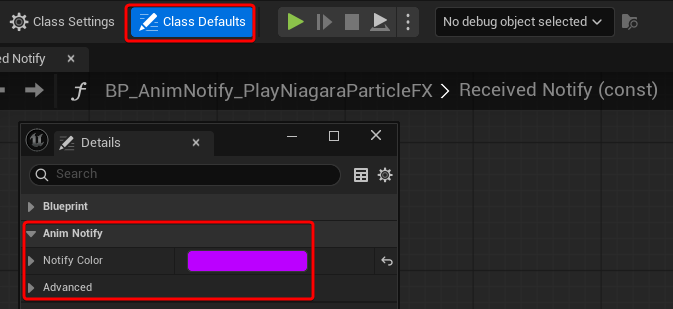
Or, more simply, click on the Class Defaults button at the top, and set them from there.
One Niagara Component Ruled by all Anim Notifiers
Not quite the nice reference quote I was looking for, but I really did not know how to title this section.
What if you have a Niagara System Component that gets spawned by an Anim Notify, and it has Niagara User Parameters that need to be updated at specific moments of the animation?
Exposing additional anim notifiers to handle this is a useful way to easily sync up the FX with what is happening in the animation. Instead of relying on some kind of “timers” that have hardcoded values in seconds within the Niagara System itself, which would be a little bit of a nightmare to time properly with trial and error. Having Anim Notifiers in the animation asset also allows for flexibility in re-timing in case a new animation gets imported, a very user-friendly way to control the FX that wouldn’t require an FX artist to update.
That being said, here we are starting to venture in the realm of more specific case by case setups. As I found out after exploring this system, it doesn’t really look like Anim Notifiers are designed for this. I’ve decided to still take the time and show what I’ve tried, since it might still be interesting for someone, and it does “technically” work. It might be useful for prototyping purposes, but it’s just not really the tool for the job and should probably be handled in different ways.
In my test example, I’ve used an Anim Notify State to “handle” the FX, spawning it at the start and deactivating it at the end. While another Anim Notify sets the colour of the particles to a new colour every time it triggers.
I’ve also used the tick function on the Anim Notify State to sample an anim curve and use that value to control the spawn rate of the Niagara System.
Anim Notify State and Colour Trigger
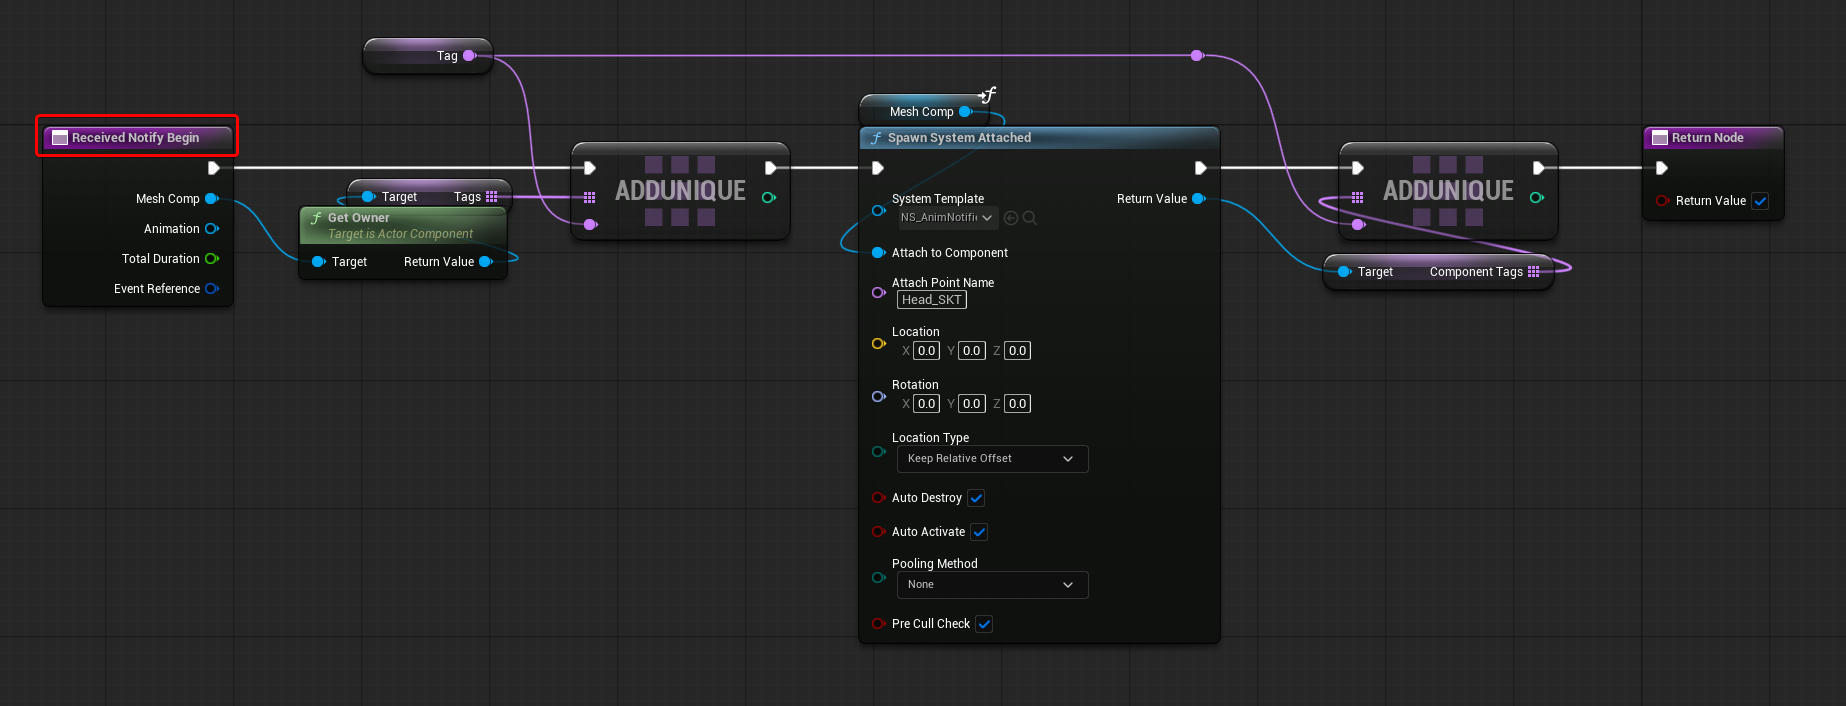
I started by creating a custom Anim Notify State and overriding both the function Received Notify Begin and Received Notify End.
The biggest problem I’ve faced when trying to make this setup is that I couldn’t find a way to store the reference to the spawned Niagara System Component. This means that I had to rely on using tags in every function in order to fetch the reference again.
The Received Notify Begin Function spawns the Niagara System Component and adds a unique Tag Name, using an editable variable. This is added to both the Owner of the Mesh Component (the Actor that holds it) and the newly spawned Niagara System Component.
While the “Received Notify End” function deactivates the Niagara System Component, it only does so after fetching its reference by using the specified tag.

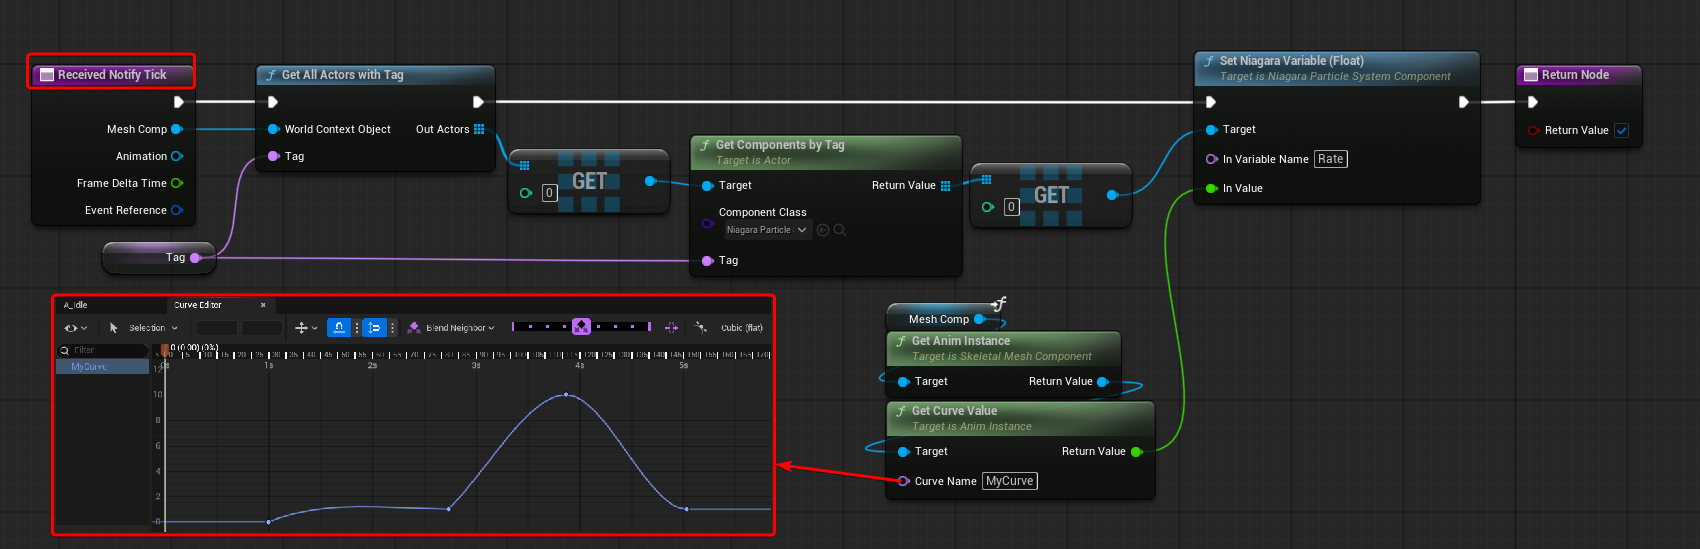
I’ve also then overridden the “Received Notify Tick” function to do the sampling of the Animation Curve and updating the Spawn Rate of the Niagara System.
In this case, I’ve hardcoded the Curve Name, but it should probably be exposed as an Editable Variable.
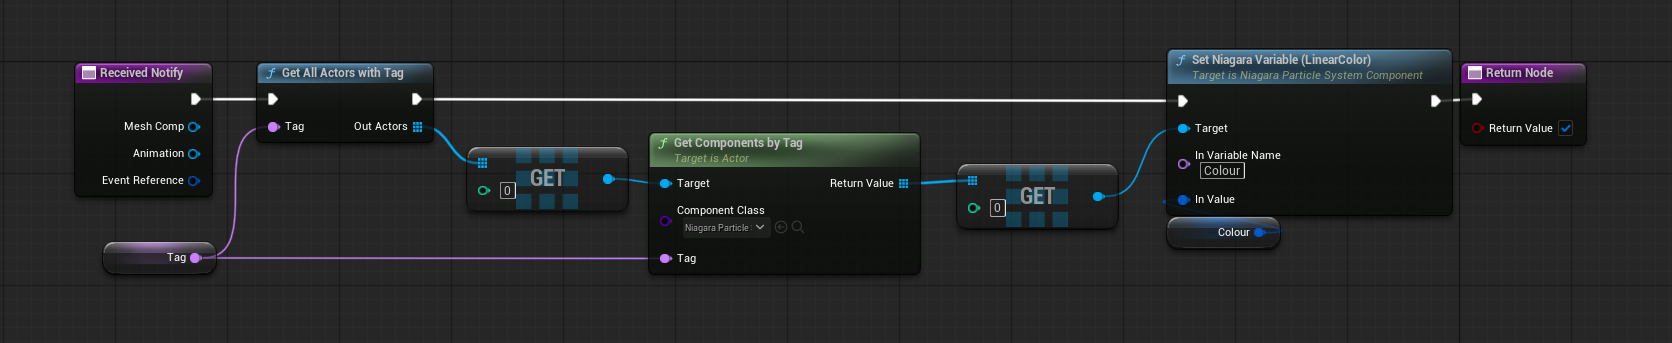
Lastly, I’ve set up the Colour Trigger Anim Notify. Because this is a separate Notify, when you use it in the animation, you need to make sure the Tag name used is the same as the one used by the Anim Notify State.
Assumptions
It’s worth noting that here I’m not destroying the component, only deactivating it; the component gets destroyed automatically once all the particles have died, because in the Received Notify Begin function, I’ve set the Boolean “Auto Destroy” to true. You can use Stat Niagara to check if your component is getting cleared after being deactivated.
It’s also important to say that this tag system, as it is implemented now, is making some assumptions:
- Only one Actor in the World is using this Anim Notify at any given time; the tag is not unique per Actor.
Because when I get the Actor Reference with Tag, I’m just getting the first entry of the array using the get node, without any Loop. This could be mitigated by appending the name of the Actor before the Tag’s name, so that the tag is unique for each Actor - Only one Niagara System Component is getting spawned during the animation.
Similar reason as the previous one, when getting the Components by Tag, the logic is only getting the first entry of the array. If you need to spawn multiple FXs, you would need a unique tag for each of them by editing the exposed variable - If the animation is looping, the previously spawned Niagara System Component was already destroyed before the new one was spawned.
Same reason as the previous one, if the previously spawned Component still exists, that will be the one that gets targeted when updating the User Parameters using the various triggers. You could probably fix this by looping over all the components with the tag and only fetching the one that is still active, since the previous one should be deactivated by then.
Problem and Potential Alternative
As I have hinted earlier, I don’t think Anim Notifies alone are enough to handle this kind of feature, mainly for one reason: there is no out-of-the-box way to store a Reference to the Spawned Component.
This leads to two undesired behaviours:
- As it probably transpired in the assumptions section, there are a lot of edge cases that the Tag system would have to deal with.
- In the case you need to update something every frame, you would also need to fetch the reference every frame.
This is why I’ve mentioned this might be a good setup for a prototype, but not much else. It does work, but it’s not ideal.
Of course, it’s a case-by-case situation, but when you need something like this, you can probably rely on existing blueprints, where you can easily store the references you need. For example, if you are spawning this FX on an enemy, the enemy actor is probably already a Blueprint. There, you can add Custom Events that handle the FX by spawning, deactivating, and updating it every frame with your anim curve if necessary. Even better, if the circumstances allow it, the Niagara System Component could already exist in the Blueprint, having the Notifiers only activating and deactivating it, so that the asset remains loaded.
On the Animation asset, the Anim Notifiers will look the same, the only thing that changes is their logic, that, instead of doing the tagging logic the way I’ve showed in this post, they would just get the Mesh Component Owner and call the various Custom Events, it might just require a “Cast to [BlueprintName]” node for it.
Conclusion
Creating these kinds of custom Anim Notifiers through Blueprint is very powerful.
Even though the second exploration I’ve done was only partially successful, the core idea of making your logic with exposed parameters really gives you a lot of options. Not only to create something generic, like the FX spawner I’ve showcased, but also for more specific setups that your project requires! Because of this, they are very flexible, and being able to place them exactly on the frame you need is great for easily timing FXs.
I hope you’ve found this article useful. Have a great day!
Leave a Reply